You don’t get a spa feel by swapping towels; you get it by specifying outcomes, then locking down layout and plumbing before you touch finishes. Start with a must‑have list (quiet fan, slip‑rated tile, concealed storage) and treat your plan like a build script: dependencies first, upgrades second. Set a priority budget, pick a neutral palette, and define one fixture finish. Next, you’ll need to decide what you’re not changing…
Define Your Spa‑Style Bathroom Goals (and Must‑Haves)
Before you touch tile samples or start demolition, define a clear “spa” target state and translate it into non‑negotiable requirements: the sensory outcomes you want (quiet, warm, uncluttered, easy to clean), the daily workflows you need to support (single vs. shared use, morning rush vs. long soaks), and the hard constraints you can’t violate (room dimensions, plumbing stack locations, electrical capacity, ventilation, and budget).
Then write it like a spec: target illuminance and CCT for vanity/task, maximum sone rating for the fan, slip resistance (DCOF) for wet floors, and IP rating for luminaires in splash zones. Define storage counts, not vibes: towels-per-user, hamper volume, and whether Luxury towels need heated, lint-controlled shelving. Lock in material tolerances for mildew resistance and cleaning chemicals, and choose Aromatherapy scents only after you’ve budgeted ventilation performance.
Plan the Layout and Plumbing Changes First
Once you’ve locked your spa-spec, map the layout around the plumbing and electrical realities first, because moving supply, drain, and vent lines drives cost, schedule, and permit scope.
Start by locating the existing stack, vent path, and shutoffs, then keep the toilet, shower, and vanity on shared wet walls when possible. Confirm required trap sizes, vent distances, and cleanout access, and maintain slope on horizontal drains (typically 1/4 in. per foot).
If you’re relocating fixtures, verify joist drilling/notching limits and plan blocking for grab bars, wall-hung vanities, and niches.
Coordinate dedicated GFCI/AFCI circuits, lighting zones, and a code-compliant bathroom ventilation fan ducted outdoors with proper makeup air.
Detail waterproof flooring progression, pan/curb height, and membrane laps before tile goes down.
Set a Bathroom Renovation Budget by Priority
Although spa-style finishes can scale up fast, you’ll keep the renovation on track by setting a priority-based budget that separates must‑have performance items from upgrade cosmetics.
Start with code-driven line items: licensed plumbing/electrical, waterproofing membranes, GFCI/AFCI protection where required, exhaust fan CFM sized to room volume, and proper venting. Assign these as Tier 1 in your Budget allocation.
Then fund Tier 2 durability (tile backer, valves, shower pan), and Tier 3 aesthetics (hardware, mirrors, lighting trims).
Add 10–15% contingency for concealed damage and permit fees.
Use Cost saving strategies that don’t compromise compliance: keep fixture locations, reuse sound cabinets, choose standard-size tubs/doors, and phase luxury add-ons after final inspection.
Track spend weekly against bids and change orders.
Choose a Calm Color Palette for a Spa Look
When you choose a calm palette early, you’ll control undertones across tile, paint, grout, and lighting so the room reads like a cohesive spa instead of a patchwork of whites. Start with a base neutral (warm greige, soft sand, or cool putty), then set a strict ratio: 70% base, 20% secondary, 10% accent.
Use Color psychology to bias toward low-saturation hues: muted blue-green for lowered arousal, or clay-taupe for grounded warmth and mood enhancement. Validate choices with samples under your actual conditions and compare LRV to avoid high-contrast banding at transitions.
Specify grout in the same value family as tile to reduce visual noise. If you’re painting, pick a washable, low-sheen finish that hides minor substrate defects.
Layer Soft Bathroom Lighting Around the Mirror
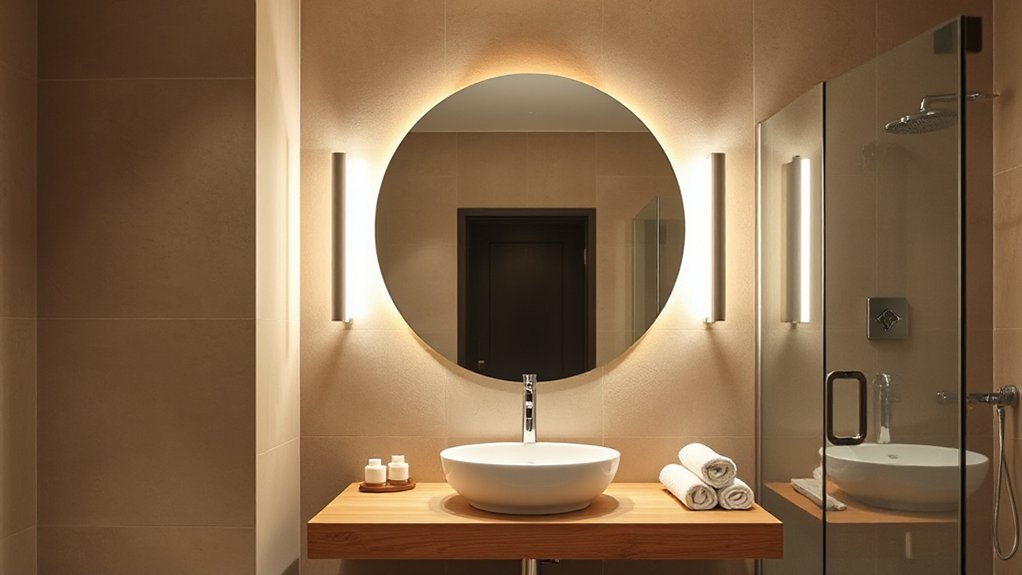
Because mirror tasks expose every harsh shadow, you’ll get the most spa-like result by layering soft, high-CRI light sources around the mirror instead of relying on a single overhead can.
Put vertical sconces at eye level, 28–36 inches apart, or use an LED mirror with a 90+ CRI strip to keep skin tones accurate. Target 2700–3000K, then add a dimmer so you can drop to an ambient glow for nighttime.
If you’re wiring, follow NEC box-fill and fixture ratings for damp locations, and keep switches on a dedicated lighting circuit.
Add a low-lumen toe-kick night light on an occupancy sensor, but keep it warm. This stack improves mirror illumination without glare or hotspotting.
Pick Low‑Maintenance Tile (Slip‑Resistant, Too)
You’ll spec slip-resistant floor tile with a verified DCOF (target ≥ 0.42 for wet areas per ANSI A326.3) and favor matte porcelain or textured ceramic where water hits.
You’ll cut maintenance by pairing it with epoxy or high-performance urethane grout, tight joint spacing, and a sealer strategy that matches the grout chemistry.
You’ll lock in durability by choosing moisture-proof finishes—through-body porcelain, properly flashed connectivity, and waterproofing membranes at shower zones—so the surface resists swelling, staining, and failure over time.
Slip-Resistant Tile Choices
How do you get a spa-clean look without turning your bathroom floor into a skating rink? Start with slip safety metrics, not showroom gloss. Specify tiles tested to ANSI A326.3 (DCOF): target ≥0.42 for level interior wet areas, and don’t dip below it at thresholds or near the shower.
Favor smaller formats (2″x2″ or mosaics) because more grout joints increase traction, but keep the surface easy to wipe. Choose matte porcelain or through-body porcelain with a controlled tile texture; avoid polished stone unless it’s factory-honed and rated.
For wet-room or curbless layouts, look for R10/R11 slip ratings (DIN 51130) and pair with proper slope planning. Verify manufacturer data sheets, not marketing labels.
Easy-Clean Grout Options
Slip resistance keeps you upright; grout choice keeps the floor looking spa-clean after daily wet use. For easiest cleaning, specify epoxy grout (ANSI A118.3): it’s nonporous, resists staining, and needs minimal grout maintenance.
If you prefer cementitious, pick a high‑performance, polymer‑modified grout (ANSI A118.7) and apply a penetrating sealer on schedule; skip unmodified A118.6 in splash zones.
Keep joints tight—1/16–1/8 inch with rectified tile—so you reduce soil traps, but follow tile and TCNA limits for lippage and coverage.
Use 100% silicone at changes of plane per EJ171, not grout.
Choose a grout color that matches tile to hide residue, or use deliberate color contrast to outline layout.
Durable Moisture-Proof Finishes
Because a spa-style bath lives in a near-constant wet/dry cycle, lock in moisture-proof finishes by specifying dense, low-absorption tile and a wet-area-rated assembly rather than “water-resistant” surfaces. Choose porcelain (≤0.5% absorption per ANSI A137.1) or vitreous ceramic, and set it over a bonded waterproof membrane that ties into the drain flange, corners, and penetrations.
On floors, specify DCOF ≥0.42 for level interiors (or higher if your inspector prefers) and use smaller formats or mosaics to increase grout joints for traction.
Keep maintenance low with rectified edges and sealed movement joints at perimeters per TCNA EJ171.
Select Eco friendly materials like recycled-content glass mosaics, then add Artistic accents with niche backer tile or a feature stripe.
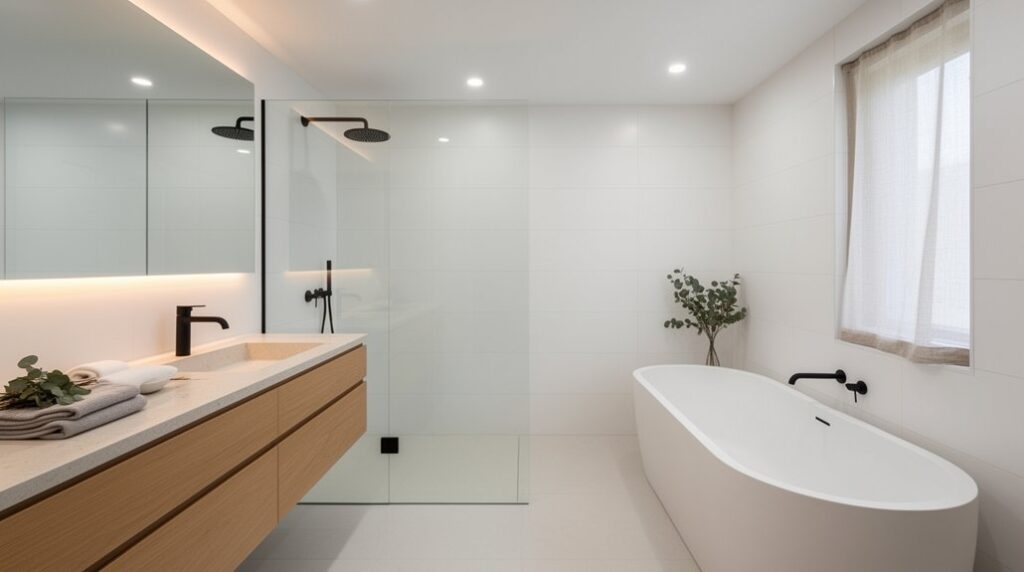
Upgrade to a Sleek Vanity With Hidden Storage
You’ll get a cleaner sightline and easier floor maintenance when you spec a floating vanity, but you’ll need to verify wall blocking, stud layout, and load rating before you anchor it.
Configure the casework like a tight schema: full‑extension hidden drawers, toe‑kick compartments, and U‑shaped cutouts around plumbing to maximize usable volume.
Then you’ll keep the countertop “surface = null” by assigning daily essentials to closed modules—internal organizers, tilt‑out trays, and mirrored‑cabinet backups—so everything stays concealed but indexed.
Choosing A Floating Vanity
If you’re trying to make a small bathroom read larger without rewriting the whole layout, a floating vanity gives you a clean “wall‑mounted” line, exposes more floor area, and hides clutter behind closed panels.
Start by mapping plumbing rough‑ins: confirm trap arm height, supply stub‑outs, and shutoff access so the cabinet clears without notching structural members.
Compare Floating vanity styles by load path: a rail‑hung box needs continuous blocking; a bracket‑hung carcass needs rated steel supports.
For Wall mounted vanity options, spec moisture‑resistant plywood, edge‑banded panels, and a sealed toe‑kick shadow gap.
Anchor into studs or add 2x blocking per manufacturer torque specs.
Keep the underside clear for mop access and verify GFCI receptacle placement meets code.
Maximizing Hidden Drawer Space
While a floating vanity opens up the floor plane, you’ll reclaim the most function by specifying concealed storage that works around plumbing and electrical constraints. Order a U‑shaped top drawer with a removable trap cutout, keeping the P‑trap accessible per code while preserving hidden storage volume.
Specify full‑extension, soft‑close slides rated 75–100 lb, and keep drawer boxes at least 1/2 in from supply stops and GFCI-protected receptacle wiring paths.
Add a shallow “false-front” tip‑out tray only if it doesn’t violate required clearance to the basin.
For drawer organization, use adjustable dividers sized to 3 in modules so you can reconfigure without tools.
Seal all drawer interiors with catalyzed finish to handle humidity and cleaning cycles.
Concealing Daily Essentials
Once the drawers handle the plumbing cutouts and load ratings, the next win comes from hiding the items that otherwise live on the countertop. Specify a vanity with a tilt‑out false front for toothbrushes and a pull‑out caddy for hair tools; route a GFCI‑protected receptacle inside, but keep cord exits grommeted and away from P‑traps per NEC wet‑location practice.
Add a shallow top drawer with modular dividers for meds and razors, and lock it if kids use the bath. Use soft‑close, full‑extension slides rated 75 lb, and seal MDF edges with waterproof primer.
Pair storage solutions with a toe‑kick drawer for scales. Finish with decorative accents that don’t block access panels.
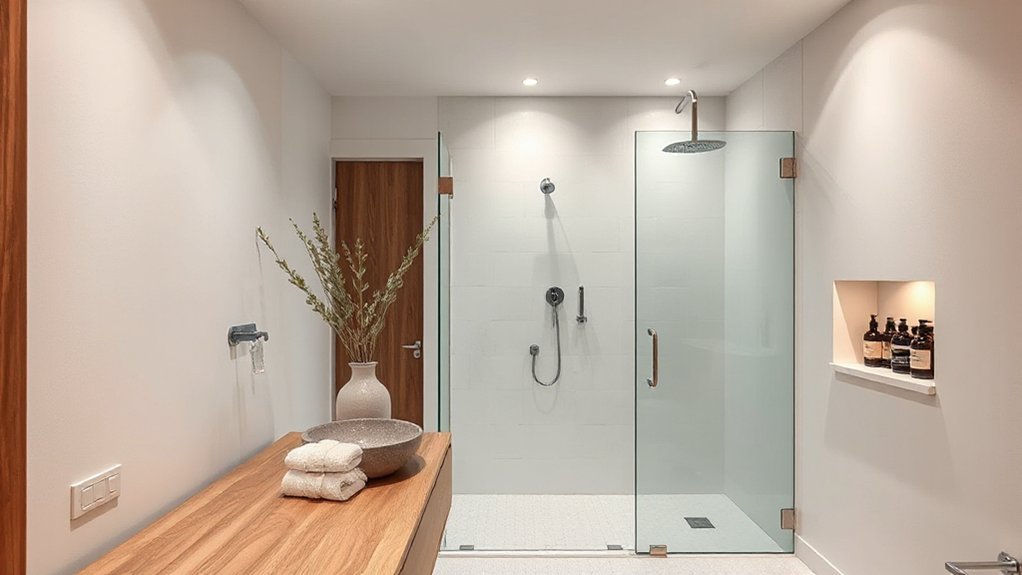
Build a Spa Shower: Pressure, Heads, and Glass
Because a spa shower only performs as well as its water delivery, start by auditing pressure and flow (static PSI, dynamic PSI under load, and GPM at the valve) before you pick hardware.
If dynamic pressure collapses, upsize supplies where allowed, shorten runs, and confirm the PRV and shutoffs aren’t restricting flow.
Size the valve to total demand and local code; many jurisdictions cap showerheads at 2.5 GPM, so choose efficient heads and body sprays that still feel full.
Use a thermostatic mixing valve with integral stops, and set the limit stop to prevent scalding.
For a glass enclosure, specify tempered safety glass, continuous waterproofing to the curb, and slope the pan 1/4 in. per ft to the drain.
Include an exhaust fan too.
Match Modern Fixtures in One Finish (Brushed, Matte)
If you want a modern spa look that reads intentional (not piecemeal), lock in one finish family—brushed nickel, brushed brass, matte black, etc.—and specify it across every visible metal: valve trim, showerhead, hand shower bar, tub filler, faucet, drain grate, towel bars, robe hooks, mirror frame, and even switch plates.
Matching fixtures reduces visual noise and simplifies purchasing: you can verify part numbers, series compatibility, and rough-in valve requirements before walls close.
Keep finish consistency by staying within one manufacturer line when possible; “matte black” varies by brand and batch. Confirm the trim kit fits your pressure-balance or thermostatic valve body, and that escutcheons cover allowable rough-in tolerances.
Use listed accessories in wet zones and corrosion-rated fasteners at anchors. Document finishes on the schedule.
Finish With Grout, Caulk, and Simple Textures
You’ll lock in that spa-grade look by executing crisp grout lines—consistent joint width, properly tooled, and sealed per manufacturer spec. You’ll run seamless caulk beads at all plane changes and wet shift to meet tile standards, maintain movement joints, and prevent capillary leaks.
Then you’ll keep the surfaces calm by layering simple textures (matte tile, linear relief, soft textiles) in a controlled palette so the finish reads clean, not busy.
Crisp Grout Lines
After the tile sets and your layout passes a quick “grid check” (straightedge + level), lock the look in with crisp grout lines: vacuum the joints, remove every spacer, and confirm consistent joint depth (aim for ~2/3 tile thickness) so the grout keys in instead of skinning over dust.
Match grout type to exposure: cementitious for most walls, epoxy for shower floors and niches; keep joints ≥1/16 in per ANSI and honor movement joints at changes of plane. Mix per data sheet, then slake and remix to control color and shrinkage.
Pack diagonally with a hard float, strike consistently, and wipe with a barely damp sponge to avoid washout. Your tile patterns read sharper, and grout maintenance stays easy when you seal or use presealed grout.
Seamless Caulk Seals
Crisp grout lines lock the field tile in place, but caulk finishes the job where assemblies move: inside corners, tub-to-tile, shower pan-to-wall, and countertop-to-splash. Use a color-matched 100% silicone that’s rated for wet areas and complies with ASTM C920; don’t use grout in changes of plane.
Prep like a pro: remove dust, dry the joint, and wipe with denatured alcohol where allowed by the manufacturer.
Backer rod sets depth so the bead bonds to two sides only, reducing splits. Tool a slightly concave profile to shed water for mold prevention, and keep the joint continuous at junctions.
For caulk maintenance, inspect annually, retool small voids early, and replace any bead that’s peeling, cracked, or discolored.
Layered Simple Textures
Once your grout and silicone cure to spec, you can build a spa-like finish by layering a few simple, clean textures that still read as code‑appropriate and easy to maintain.
Keep joints consistent: sanded grout for wider tile gaps, unsanded for tight joints, and 100% silicone at all changes of plane per ANSI guidance.
For textural contrast, mix a matte porcelain field with a honed stone niche shelf, but seal only where required so surfaces stay slip‑resistant (meet DCOF where applicable).
Add decorative accents sparingly: a ribbed glass band at eye level or a micro‑mosaic on the niche back, then tool silicone smooth to avoid debris ledges.
Use color‑matched caulk, caulk backer rod at deep gaps, and wipe haze promptly.
Frequently Asked Questions
How Long Does a Typical Spa‑Style Bathroom Renovation Take?
You’ll typically finish a spa-style bathroom renovation in 3–8 weeks. If you spec Luxury fixtures and integrate Mood lighting, you’ll add 1–2 weeks for lead times, rough-in, inspection, commissioning, punch.
Do I Need Permits for Bathroom Plumbing or Electrical Updates?
Yes—you’ll likely need permits for plumbing or electrical updates. Local permit requirements apply when you move drains, add circuits, or alter wiring. Electrical regulations require licensed work, GFCI/AFCI protection, inspections, and load calculations.
Can I Renovate a Bathroom While Still Living in the Home?
Yes—you can, but it’s like refactoring live code. You’ll schedule noisy demo in sprints, isolate dust with plastic, keep one bath online, and define Temporary relocation and Budget planning contingencies in your plan.
What Should I Do if I Discover Mold or Water Damage?
Stop work, isolate the area, and document with photos. You’ll fix the source leak first, then hire licensed mold remediation if growth exceeds limits. You must meet IICRC/IRC guidance, dry to spec, complete water damage repair.
How Can I Improve Ventilation to Prevent Fog and Mildew?
Install a properly sized exhaust fan and duct it outdoors; you’ll cut fog fast. Evaluate Ventilation options: timer switch, humidity-sensing control, or continuous low-CFM mode. Seal penetrations, keep doors undercut, and prioritize Moisture control.
Conclusion
You’ve defined must‑haves, locked layout/plumbing, and budgeted by priority, so you’re ready to ship a spa bathroom. Keep the palette neutral, then layer soft, low‑glare lighting (CRI ≥90) at the mirror. Install a floating vanity with concealed storage, waterproof the shower like a system (membrane + drain + slope), and spec slip‑resistant tile. Standardize fixtures to one finish for visual cohesion. Seal grout, tool caulk cleanly, and you’ll be home free.