You can’t wait for a drip to confirm a roof leak, because hidden moisture can rot sheathing and violate basic weatherproofing requirements. You start indoors by checking ceiling stains and attic decking, then you rule out HVAC condensate or plumbing lines. When you go topside, you use fall protection and inspect shingles, flashing, penetrations, valleys, and gutters for lift, cracks, rust, or nail pops. The next step is pinpointing the entry path without causing more damage…
Spot the First Signs of a Roof Leak
Where do roof leaks usually show up first? You’ll typically see ceiling stains near exterior walls, softened drywall seams, or bubbling paint under roof penetrations.
In the attic, you’ll spot darkened sheathing, rusty fasteners, or compressed insulation aligned with a rafter bay. Track the path upslope, because water follows framing before dripping.
Stay code-compliant and safe: use a stable ladder, wear fall protection where required, and avoid stepping on wet decking. Verify ventilation baffles remain intact and don’t block eave intake.
Note your Roof material—shingles may show lifted tabs, granule loss, or exposed nails; metal may show loose seams or failed sealant.
Consider Weather impact: wind-driven rain, ice dams, and hail can open small defects quickly. Mark suspect areas for repair.
Rule Out Plumbing or HVAC Before the Roof
Before you start pulling shingles, confirm the moisture isn’t coming from plumbing or HVAC systems that run through the attic or above the stained ceiling. Shut off power to nearby fixtures at the breaker to meet basic electrical safety, then inspect accessible supply lines, drain traps, and vent stacks for active drips, corrosion, or loose slip-joints.
Check around toilet vents, laundry standpipes, and any chimney-adjacent plumbing penetrations for condensation or pinhole leaks—common Plumbing issues mistaken for roof failure.
Next, verify the air handler and condensate drain: confirm the trap is primed, the secondary pan isn’t overflowing, and the drain line flows freely.
Ice on refrigerant lines, blocked filters, or wet insulation point to HVAC malfunctions, not roofing.
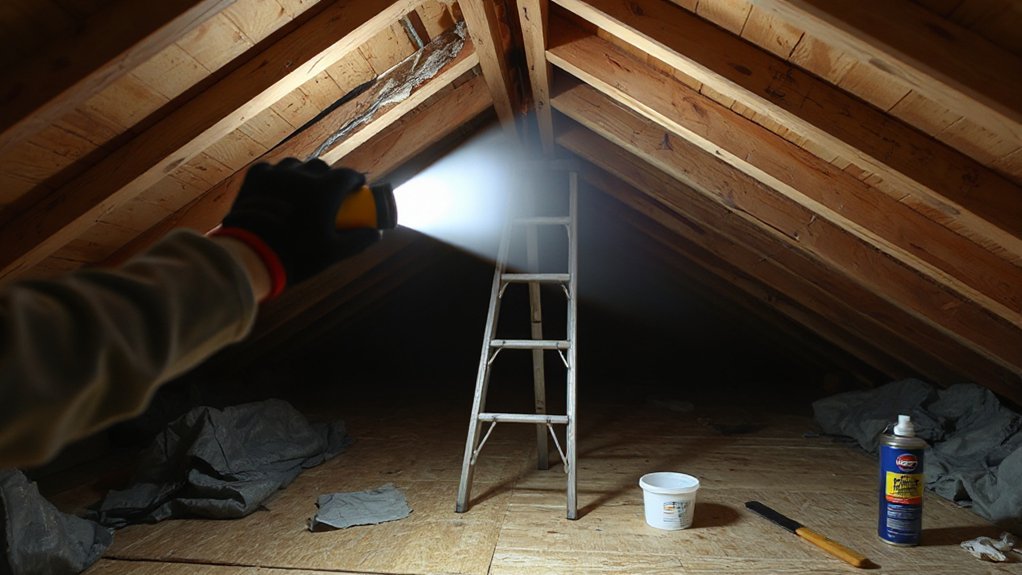
Check the Attic to Trace Roof Leaks Safely
Before you enter the attic, you’ll follow basic safety precautions: wear PPE, use a stable ladder, walk only on framing members, and keep clear of exposed wiring per code.
With a bright light, you’ll identify probable leak entry points around penetrations, valleys, and roof-to-wall junctions.
Then you’ll track moisture staining, damp insulation, and rusted fasteners upslope to the highest wet mark to pinpoint the source.
Attic Safety Precautions
Although an attic can help you pinpoint the path of a roof leak, it also adds fall, electrical, and respiratory hazards that you must control first. Wear a P100 or N95 respirator, gloves, and eye protection, and avoid disturbing suspect asbestos or mold; stop and call a pro if you see it.
Use a headlamp, keep one hand free, and step only on joists or a rated walkway—never on drywall. De-energize nearby circuits if wiring is exposed, and keep clearance from recessed lights per listing.
Maintain attic ventilation and don’t block soffit or ridge paths. For insulation improvement, avoid compressing batts, and treat blown-in areas as hidden trip hazards.
Keep a stable ladder and adequate lighting throughout.
Identify Leak Entry Points
Once you’ve geared up and secured safe footing, use the attic to follow the leak’s evidence trail back to its roof entry point. Start with a headlamp and mirror, then inspect roof penetrations: plumbing vents, chimneys, skylights, and HVAC boots.
Check for daylight at nail holes, fastener backs-out, and gaps at sheathing joints without disturbing insulation or wiring. In wet weather, run controlled leak detection by having a helper apply water in short zones above while you observe from below, maintaining radio contact.
Mark suspected locations with tape on rafters for exterior verification. Confirm whether flashing laps shed water correctly and whether a waterproof membrane underlayment is present and intact at eaves and valleys.
If you find active dripping, stop and isolate power circuits before proceeding.
Follow Moisture Staining Trails
When water migrates along framing, it rarely drips straight down, so you need to track stains methodically from the wettest point back toward the roof deck. Start at the lowest stained insulation or drywall and move upslope, checking rafters, trusses, and nail tips for sheen or rust.
Use moisture detection tools—a pin meter or infrared camera—to confirm damp areas before you disturb insulation.
Read staining patterns: dark halos indicate repeated wetting; yellow-brown rings suggest tannins leaching from wood; white deposits can signal prolonged evaporation.
Stay on joists, not gypsum, and keep a headlamp and respirator on. Don’t step near recessed lights or wiring; maintain clearance per code and avoid contact with energized conductors.
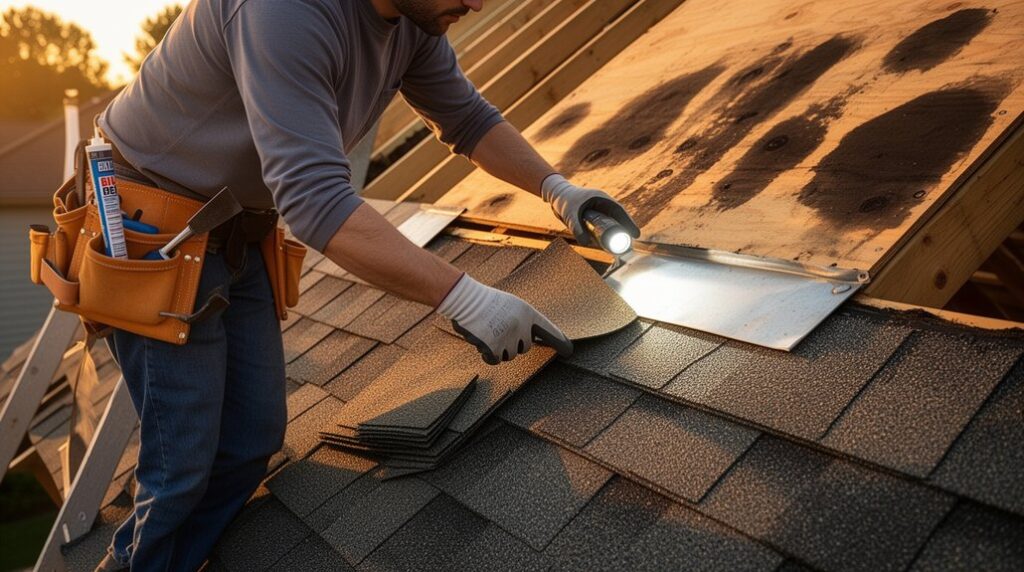
Inspect Shingles and Nails for Roof Leak Entry
Before you start sealing anything, inspect the shingles and the fasteners because most roof leaks begin where water slips past lifted tabs, cracked edges, or exposed nail heads. Use fall protection, secure your ladder, and work on a dry, low-wind day.
Scan for shingle deterioration: missing granules, curled corners, splits, and soft spots that indicate aging or impact damage. Gently lift suspect tabs and check for broken sealant strips and debris pathways.
Next, examine every exposed fastener line for nail corrosion, backing-out, or overdriven nails that fracture the mat. Per code, nails should be flush, properly placed, and covered by the next course.
Replace damaged shingles and re-nail with galvanized roofing nails, then hand-seal lifted tabs with approved asphalt cement.
Find Roof Leaks Around Flashing and Chimneys
Although shingles take most of the weather, flashing failures around chimneys, skylights, and roof-to-wall joints cause many persistent leaks because these details must shed water across multiple planes. Work dry, wear fall protection, and use a stable ladder per OSHA basics.
Start at the upslope side of the chimney and inspect chimney flashing: step flashing should interlace with each shingle course, counterflashing should be let into reglets or mortar joints, and fasteners shouldn’t sit exposed in the water path. Look for lifted edges, cracked sealant, rust holes, or missing kickout flashing at wall terminations.
Check the roof valley nearby for debris dams, open seams, or nail pops that divert runoff into flashing laps. If you see staining, map it to the highest defect above.
Track Roof Leaks at Vents, Skylights, and Boots
Even if your shingles look intact, leaks often start where penetrations interrupt the roof plane—plumbing vents, attic fans, and skylights rely on boots and curb flashing that can crack, shrink, or pull loose.
From the attic, trace stains uphill to the penetration, then check for daylight, damp sheathing, or rusty fasteners.
On the roof, stay tied off and verify the boot’s flange lies flat, nails are sealed, and the counterflashing overlaps per manufacturer instructions and local code.
Replace split neoprene boots and re-seat loose flashing; don’t rely on surface caulk as a primary seal.
Confirm compatible roofing materials, and correct ventilation issues that drive condensation around skylight wells.
Finish with a controlled hose test to confirm the repair.
Check Valleys, Gutters, and Roof Edges for Leaks
Next, you’ll inspect roof valleys for leaf and granule buildup that can dam water and force it under the shingles. So secure your ladder and use fall protection per OSHA requirements.
Clear debris by hand or with a soft brush to avoid damaging valley metal or shingles. Then verify the valley flashing is intact and properly lapped.
Finish by cleaning gutters and confirming the drip edge is unobstructed and properly directs runoff into the gutter to prevent edge and fascia leaks.
Inspect Valleys For Debris
When you’re tracing a leak, inspect each roof valley first because it concentrates runoff and fails quickly when it’s obstructed. Set your ladder on firm ground, use fall protection where required, and don’t step on wet metal flashing.
Scan for Valley debris such as leaves, granules, twigs, or ice dams that can force water sideways under shingles.
Check the valley’s centerline for standing water stains, rust, pinholes, or lifted edges at seams. Confirm shingles are cut cleanly and don’t bridge the channel, per manufacturer instructions.
Probe gently with a plastic tool; avoid tearing underlayment. If you find packed material, plan controlled valley cleaning and recheck for exposed fasteners or sealant failure.
Document defects and schedule repairs before the next rain event.
Clear Gutters And Drip Edges
After you’ve verified the valleys are clear and intact, move to the eaves and clean the gutters and drip edges because overflow here can push water behind fascia and under the first shingle course.
Set your ladder on firm ground, maintain three points of contact, and wear gloves and eye protection.
Scoop debris, then flush downspouts to confirm full flow; standing water signals a clog or improper slope.
During gutter maintenance, look for separated seams, rust pinholes, loose hangers, and missing end caps.
Inspect the drip edge for continuous coverage, tight nailing, and proper overlap at joints; it should direct water into the gutter, not behind it.
Reseal small gaps with compatible sealant and replace damaged sections.
Test with a hose afterward.
Repair Roof Leaks With Sealant, Patches, and Flashing
Although tracing the source of a leak takes patience, the actual repair usually comes down to restoring a continuous weather barrier with the right sealant, a properly fastened patch, or code-compliant flashing.
Before you start, set fall protection, keep three points of contact, and work only on a dry roof. Clean and dry the substrate, then use advanced sealant techniques: tool a compatible polyurethane or butyl sealant into laps, fastener heads, and small cracks, maintaining required clearances from heat sources.
For emergency control, install temporary patch materials like peel-and-stick membrane or reinforced roof tape, extending beyond the defect and rolling for full adhesion.
Replace or reset flashing at penetrations and step shifts, shingling it correctly and fastening per manufacturer instructions.
Verify drainage paths and water-test.
Know When a Roof Leak Needs a Pro Repair
Sealant, patches, and properly lapped flashing can stop many leaks, but some conditions put the repair outside safe DIY scope and into licensed-roofer territory.
If you see widespread shingle failure, soft decking, or sagging rafters, you’re beyond a surface fix and into structural repair that must meet local code and manufacturer specs for your roof material. Call a pro when leaks occur around skylights, chimneys, valleys, or penetrations where improper underlayment, step flashing, or ice-and-water shield can void warranties.
You should also stop if the roof pitch is steep, access is unsafe, or weather conditions include wind, rain, frost, or heat that compromises adhesion.
If water reaches wiring, insulation, or moldy assemblies, get qualified remediation and roofing crews.
Frequently Asked Questions
Does Homeowners Insurance Cover Roof Leak Repairs and Interior Water Damage?
You’re often covered for sudden roof leaks and resulting interior water damage, but you’ll face coverage limitations for wear, deferred maintenance, or code upgrades. File insurance claims promptly, mitigate damage, document conditions, and follow local building codes.
How Much Does a Typical Roof Leak Repair Cost in My Area?
You’ll typically pay $200–$900 locally for roof leak repair, depending on Roof inspection results and Leak detection complexity. Code-compliant flashing replacement can run $500–$1,500; structural deck repairs often exceed $1,500. Verify permits, fall protection.
Can I Stay in My Home While a Roof Leak Is Being Repaired?
Yes, you can usually stay home; it’s like sheltering under an umbrella in a storm. Schedule Roof inspection and Leak detection first. You’ll cordon off work zones, guarantee ladder safety, and verify code-compliant ventilation.
How Long Can a Roof Leak Go Untreated Before Mold Becomes a Problem?
Mold can start within 24–48 hours after moisture intrusion, so you can’t wait. Prioritize Leak detection and Mold prevention: isolate wet areas, run dehumidifiers, and schedule code-compliant repairs immediately to prevent hidden growth.
What Maintenance Schedule Helps Prevent Roof Leaks Year-Round?
Treat it like a mission-critical system: schedule roof inspection every spring/fall, after major storms, and before winter. Perform monthly gutter maintenance. Follow manufacturer specs, local code, use fall protection, document defects, and repair immediately.
Conclusion
When you catch a leak early, you prevent pricey, progressive damage. Stay sharp: scan ceilings, step into the attic with solid footing, and follow stains to the source. Seal small separations with roof-rated sealant, swap split shingles, and secure flashing with code-approved fasteners and underlayment laps. Keep gutters and valleys clear to control runoff. If you see widespread wear, steep slopes, or active dripping, stop and call a licensed roofer for safe, compliant repairs.