Big repairs feel dramatic, but small upkeep protects your home’s value. You can prevent moisture and safety issues by clearing gutters, confirming downspouts discharge away from the foundation, and checking grading after storms. You should seal window and door gaps to maintain the envelope and limit pests. You’ll also keep HVAC filters and drains serviced per manufacturer specs and spot plumbing leaks early. Next, you’ll set a simple inspection cadence that catches…
The Home Maintenance Checklist That Protects Value

Why wait for a small issue to become a costly repair? Use a value-protecting home maintenance checklist and stick to it. Test smoke and CO alarms monthly, replace batteries twice yearly, and verify you’ve got the correct extinguisher rating and clear egress paths.
Inspect HVAC filters and change them per manufacturer specs; document service dates for warranty compliance.
Check plumbing supply lines under sinks for corrosion or soft spots, then tighten fittings to torque guidance.
Examine caulk at tubs and backsplashes; re-seal to prevent hidden deterioration.
Review attic insulation coverage and keep vents unobstructed.
Walk exterior siding and trim for peeling paint and soft wood.
Finally, keep Home decor surfaces clean and protect finishes, and maintain landscaping design edges to prevent trip hazards.
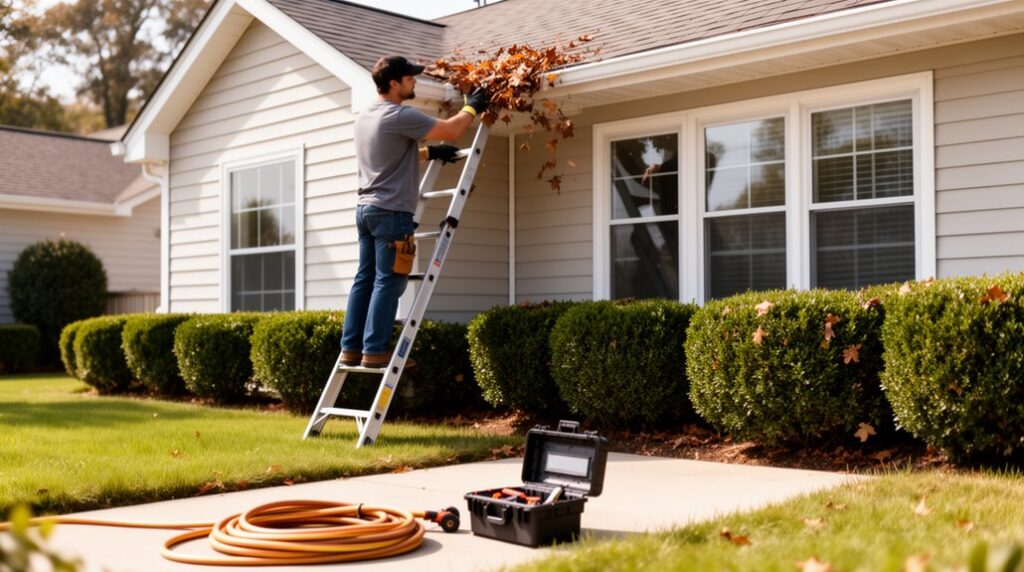
Stop Water Damage: Gutters, Grading, and Drains
A solid checklist doesn’t stop at the fixtures and finishes—water management outside your walls often decides whether you face rot, mold, or a foundation claim. Start with gutters: clean them at least twice a year and after major storms, and confirm downspouts discharge 6–10 feet from the foundation or into an approved drain line. Use a stable ladder, gloves, and eye protection; follow manufacturer load ratings.
Next, check grading. You want a minimum 6-inch fall over the first 10 feet away from the house to support Rainwater management. Rebuild low spots with compacted soil and keep mulch thin near the siding.
Finally, verify drains and swales stay clear and slope to daylight. Add gravel splash pads to reduce erosion control and prevent soil washout.
Seal Cracks and Gaps Before They Spread
You can’t fix what you can’t find, so you should inspect around windows, doors, penetrations, and sill plates for hidden air leaks using a flashlight and a smoke pencil while following ladder and PPE basics.
You’ll get a durable, code-aligned seal when you match the product to the joint—paintable acrylic-latex for small interior gaps, silicone for nonpainted wet areas, and expanding foam only where it’s rated and trimmed flush.
You should seal promptly and monitor the repair, because small cracks spread with movement and moisture and quickly turn into bigger comfort, pest, and water-control issues.
Find Hidden Air Leaks
Ever notice a faint draft or a sudden spike in heating and cooling costs even when everything seems shut tight? Start with draft detection: on a calm day, run your hand around window and door trim, baseboards, attic hatches, and plumbing or wiring penetrations.
Check for hidden vents behind furniture, in toe-kicks, and in dropped ceilings that may leak into wall cavities. Use a flashlight to spot daylight at joints, and use an incense stick to confirm airflow; keep flames away from combustibles and don’t test near gas appliances.
Follow manufacturer instructions for any HVAC access panels, and shut off power before opening electrical covers. Mark each leak with painter’s tape for later repair, and recheck seasonally.
Choose Proper Sealants
Where should each crack or gap get caulk, foam, or sealant? Start with sealant selection based on movement, exposure, and substrate. Use paintable acrylic-latex caulk for interior trim and small, low-movement joints.
Choose 100% silicone for wet areas and exterior joints that see UV and temperature swings.
Apply polyurethane or hybrid sealant for masonry, siding, and high-adhesion needs.
Use low-expansion foam only for larger voids around windows, doors, and penetrations—keep it off moving parts.
Prep to standard: clean, dry, and sound surfaces; remove failed material; install backer rod for deep joints to control depth.
Ventilate, wear gloves/eye protection, and follow cure-time labels.
These weatherproofing techniques reduce moisture and air intrusion safely.
Fix Issues Early
Before a small crack turns into rot, mold, or a costly repair, seal it as soon as it appears and stop water and air from driving the damage deeper. Inspect quarterly: siding joints, window/door trim, foundation hairlines, hose bibs, and attic penetrations.
Use a stable ladder, gloves, and eye protection, and keep a spotter when working above 6 feet. Scrape loose material, dry the surface, then tool sealant to a continuous bead with full contact on both sides—no voids.
Verify weep holes stay clear and don’t block vents. Inside, seal baseboard gaps and plumbing escutcheons to limit drafts and pests, supporting Home security.
Pair this with landscaping upkeep: maintain grading and mulch lines so water doesn’t pool against walls.
Keep HVAC Maintained to Protect Home Value
Keep your HVAC maintained to protect home value by scheduling seasonal tune-ups that verify safe combustion, proper refrigerant charge, and code-compliant electrical connections.
Replace air filters on the manufacturer’s interval so airflow stays within spec, preventing coil freeze-ups and motor strain.
Shut off power at the disconnect before you clean outdoor condenser coils, and clear debris to maintain rated efficiency and reduce overheating risk.
Schedule Seasonal Tune-Ups
Because HVAC systems run hardest during peak heating and cooling months, you should schedule seasonal tune-ups in spring and fall to catch wear before it turns into a breakdown. Book Seasonal inspections with a licensed technician who follows manufacturer specs and local code.
They’ll verify refrigerant charge, inspect coils and condensate drains for leaks, test safeties, and tighten electrical connections to reduce overheating risk.
Ask for equipment calibration of thermostats, pressure switches, and combustion settings so the system meets efficiency ratings and maintains stable temperatures.
Have the tech document readings, note any out-of-range values, and confirm proper airflow and static pressure to protect the blower and ductwork.
Keep service reports; buyers and appraisers view documented maintenance as value-preserving proof.
Replace Air Filters Regularly
Seasonal tune-ups catch big issues, but routine filter changes handle the day-to-day strain that drives dust buildup, airflow restriction, and blower wear.
Check your Air filter monthly and replace it on a standards-based schedule: typically every 30–90 days, or sooner with pets, renovations, allergies, or high runtime.
Follow the unit manual for size, airflow direction arrow, and recommended MERV rating so you don’t over-restrict flow.
Before swapping, shut off the thermostat or equipment switch to prevent the blower from pulling debris into the cabinet.
Slide the old filter out carefully, bag it, and vacuum the slot if accessible.
Write the install date on the frame and set a reminder so your Replacement frequency stays consistent year-round.
Clean Outdoor Condenser Coils
A clean outdoor condenser coil can drop head pressure and energy use while helping your HVAC hit its rated SEER and maintain steady capacity. Schedule outdoor maintenance at least each spring and after heavy pollen or cottonwood.
Shut off power at the disconnect and breaker, then verify it’s de-energized. Clear 24 inches of vegetation and remove the top grille if the manufacturer allows. Use a soft brush or vacuum to lift debris; don’t bend fins.
Rinse from inside out with low pressure. For coil cleaning, apply an EPA-registered, non-acid foaming coil cleaner labeled for aluminum, follow dwell time, and rinse thoroughly. Straighten flattened fins with a fin comb.
Reassemble panels, restore power, and confirm airflow and stable condenser fan operation.
Prevent Leaks With Quick Plumbing Checks
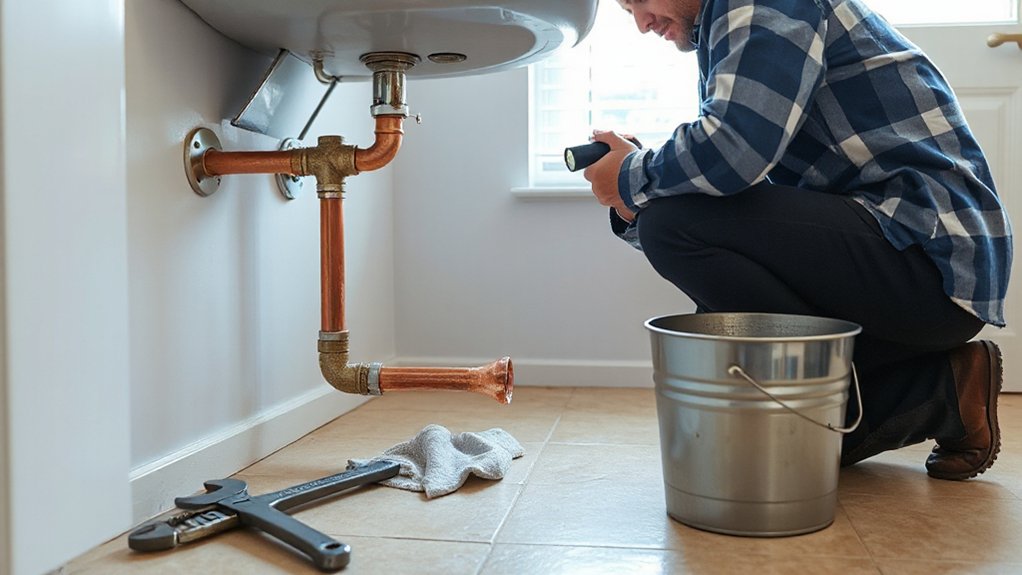
Even if everything seems fine, a few quick plumbing checks can catch small leaks before they become water damage or mold. Start by looking under sinks, behind toilets, and around the water heater for dampness, corrosion, or mineral staining.
Feel supply lines and shutoff valves for moisture, and snug loose compression nuts a quarter turn—don’t overtighten. Confirm your main shutoff valve turns freely; label it for Emergency preparedness and keep a wrench nearby.
Check toilet bases for rocking and recaulk only if the floor is solid and dry. Inspect dishwasher and washer hoses for bulges; replace rubber with braided stainless as plumbing system upgrades.
Test faucets for steady flow, then clean aerators. Run a quick drain check to confirm proper trap seals.
Catch Problems Early With Regular Inspections
While you’re already tackling small upkeep tasks, build a simple inspection routine that spots wear before it turns into a failure. Walk the home exterior monthly: check grading, downspouts, flashing, siding gaps, and cracked caulk around penetrations. Look for spongy trim, rust stains, and peeling paint that can signal moisture intrusion.
Inside, test GFCIs and smoke/CO alarms, confirm attic ventilation is clear, and scan ceilings for new discoloration. Open the electrical panel cover only if you’re trained; otherwise, look for heat marks and call a licensed electrician.
For pest prevention, inspect sill plates, vents, and soffits for openings over 1/4 inch, then seal with rated mesh and exterior sealant. Document findings, schedule repairs, and recheck after storms for damage.
Frequently Asked Questions
How Often Should I Budget for Major Maintenance Versus Minor Upkeep?
Budget monthly for minor upkeep and annually for routine items; plan major maintenance every 5–10 years. Use preventive inspections and seasonal checklists, follow manufacturer specs, document work, and reserve funds for code-required, safety-critical repairs.
Which Maintenance Tasks Offer the Best Return When Selling Soon?
You’ll get the best return from Landscaping improvements and Exterior painting. Studies show curb appeal can lift offers up to 7%, so trim hazards, fix grades for drainage, and use low-VOC, properly prepped coatings.
Do DIY Repairs Hurt Appraisal Value Compared to Professional Work?
Yes, DIY repairs can hurt appraisal value if you miss code, permits, or workmanship standards. Avoid DIY pitfalls and add Professional oversight for electrical/plumbing. You’ll document materials, inspections, and corrections to protect value.
What Maintenance Records Should I Keep for Buyers and Insurers?
Keep dated receipts, permits, contractor invoices, inspections, and before/after photos—like a town crier’s log. Include HVAC, roof, plumbing, electrical, Home warranty, pest control. Store digitally; document model/serials, code compliance, and safety test results.
Which Upgrades Count as Maintenance and Which Count as Renovations?
You count maintenance as like-for-like repairs and preventive tasks—Foundation inspection and Roof cleaning included—that meet code and manufacturer specs. You count renovations as upgrades that change layout, capacity, or finishes beyond standards.
Conclusion
Coincidentally, when you clear gutters, you also protect fascia and foundations; when you correct grading, you also keep basements dry. When you seal window and door gaps, you also block pests and drafts. When you service HVAC to manufacturer specs, you also reduce wear and avoid unsafe combustion. When you scan plumbing for drips, you also prevent mold. Keep a dated checklist, follow code where required, and fix small defects before they spread.