You’ll get the most authentic country kitchen by starting with what can’t be faked: tight-grained timber, reclaimed stone, and hardware that’s worn, not “distressed.” Choose muted, mineral-based paint—soft cream, smoke blue, hedgerow green—after your fixed finishes are set. Let patina show through burnished edges and honest repairs, then add a farmhouse sink, open shelves on forged brackets, and linens that work hard. The challenge is keeping modern convenience out of sight…
Country Kitchen Essentials: Authenticity Checklist
If you want your restored country kitchen to feel genuinely traditional, start with a quick authenticity checklist rooted in how these rooms actually worked: durable materials, visible craftsmanship, and a layout built for daily cooking rather than display.
Choose tight-grained pine, oak, or elm for cabinetry, with pegged joints, breadboard ends, and hand-planed edges you can see and feel.
Favor wide floorboards or quarry tile, lime plaster, and simple skirtings that tolerate scrubbing.
Keep storage practical: a plate rack, dry-goods drawers, and hooks near the range.
Add work-minded lighting, but disguise Contemporary fixtures with enamel shades or brass gallery details.
Limit Modern accessories to a few useful pieces, like a compact radio, and keep them visually quiet.
Start With Fixed Finishes, Then Choose Colors
Once you’ve ticked off the authenticity checklist—workable layout, honest joinery, and hard-wearing surfaces—lock in the fixed finishes that will do most of the visual heavy lifting before you touch a paint brush.
Refinish floorboards with breathable oils, not glossy polyurethane, and repair with matching species plugs. Choose cabinetry timber and door profiles that echo local vernacular; keep rails and stiles crisp, and use period-appropriate butt hinges and latches.
Settle on countertop material—scrubbed pine, honed stone, or soapstone—then commit to a backsplash you can grout and maintain.
Fit Modern lighting with discreet wiring routes and warm lamps. Hang Contemporary artwork only after you’ve established these permanent textures and sheen levels.
Then you’re ready to pick paint with confidence.
Classic Country Kitchen Color Palettes That Work
Because a traditional country kitchen relies on natural materials and soft, time-worn light, the most convincing palettes start with muted, mineral-based colors rather than sharp primaries. Begin with a warm off-white—think limewash or chalky cream—then layer stone gray, oatmeal, or fawn on cabinetry and trim for a rubbed-in look.
Add heritage green (sage, lichen) sparingly on a dresser or pantry door to echo old paint mixed with earth pigments. For a brighter note, choose faded duck-egg blue on a plate rack or door frame; it reads authentic without turning nautical.
Keep contrasts low, and repeat one dark anchor—iron-black on hinges or a range hood. Modern accessories can stay, but pick matte finishes. Contemporary furniture works when its lines are simple and colors stay quiet.
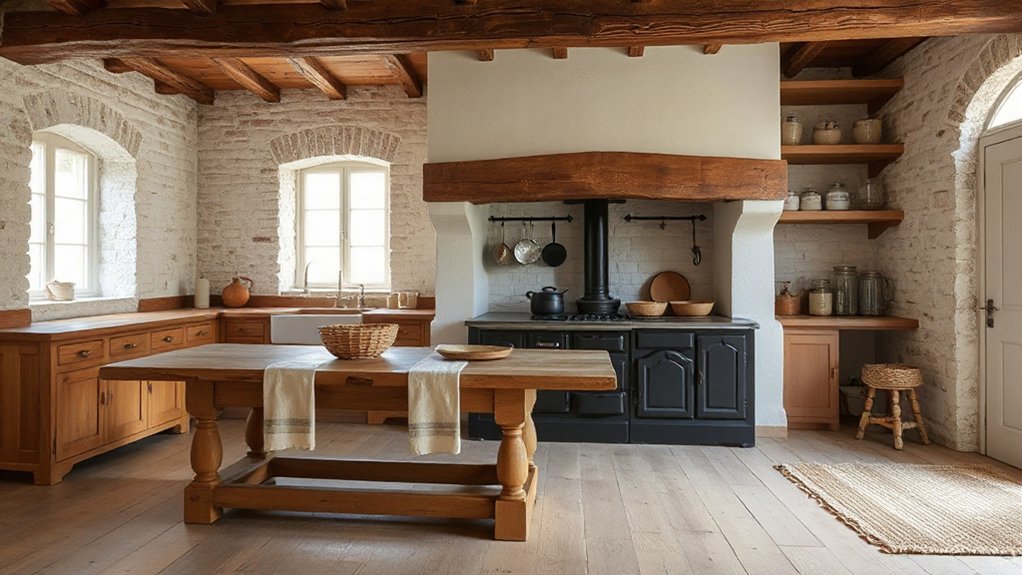
Use Natural Materials and Aged Patina
Although paint sets the mood, natural materials and honest wear make a traditional country kitchen feel lived-in rather than staged. Keep or expose Wooden beams where you can; if they’re missing, add reclaimed softwood and hand-plane edges so tool marks read true, not “distressed.”
Choose wide pine or oak boards for floors, then finish with soap, oil, or wax so traffic darkens them naturally. Let ironwork age: blackened strap hinges, thumb latches, and hook rails suit older joinery.
For counters and shelves, pick stone, thick timber, or well-used butcher’s blocks, and avoid high-gloss sealers.
Aim for weathered finishes created by time: burnish corners, soften paint layers, and keep repairs visible but neat.
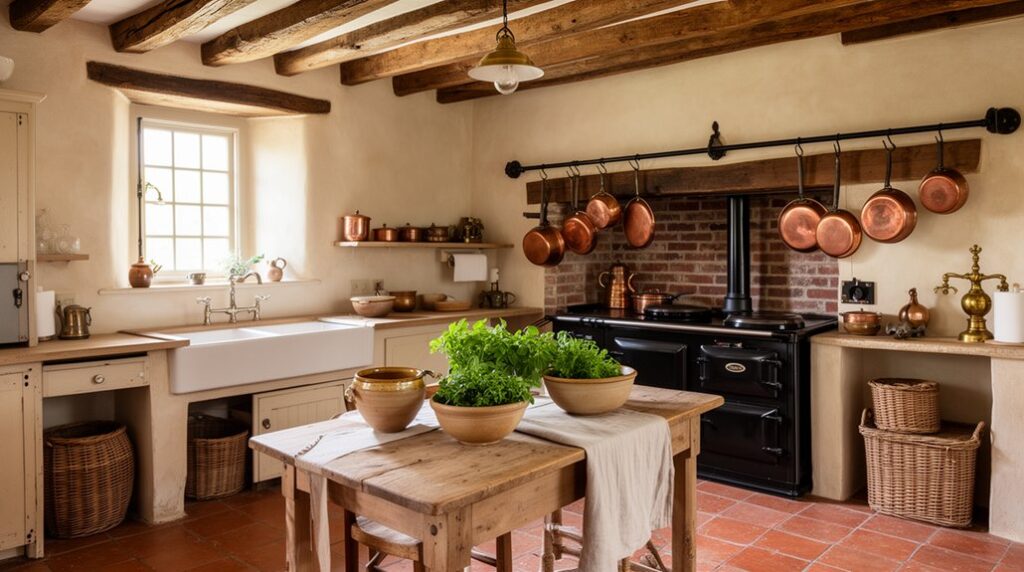
Add a Farmhouse Sink and Traditional Taps
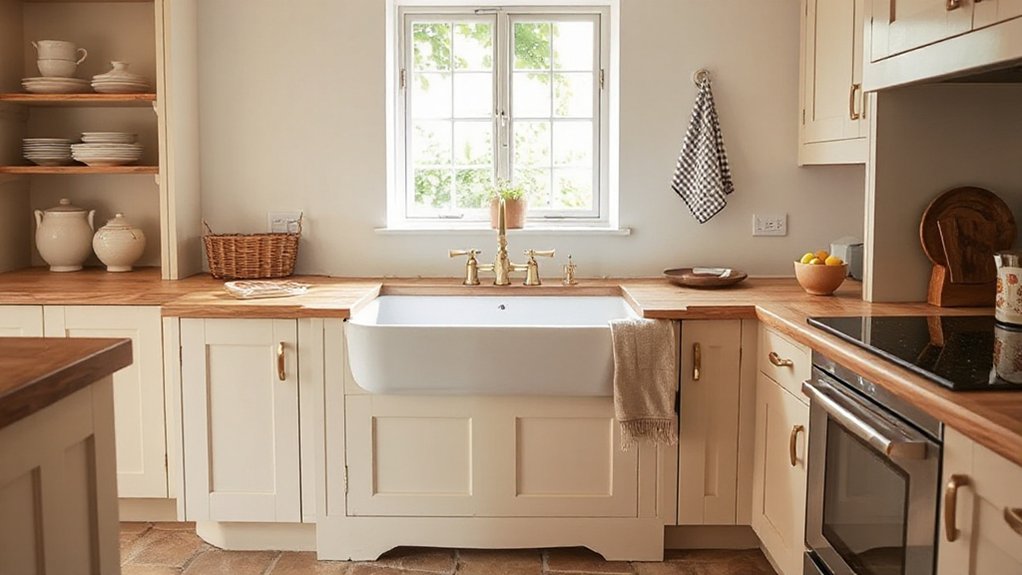
Natural timber, worn stone, and aged iron set the tone; now give the room a working centerpiece with a farmhouse sink and traditional taps.
Choose fireclay or vitreous china for period-true durability, with an apron front that protects cabinetry from splashes. If you’ve inherited a Belfast-style sink, keep the thick rim visible and set it on a stout timber frame or simple base cabinet.
Pair it with bridge taps or a single-lever mixer in unlacquered brass, nickel, or blackened iron so it’ll mellow with use. Fit proper backnuts and fiber washers, then add Farmhouse fixtures like a chain-and-plug waste and ceramic indices.
Finish with traditional hardware—crosshead handles and exposed unions—for honest, serviceable craft.
Choose Country Kitchen Lighting (Task + Ambient)
Once you’ve set in a proper sink and taps, plan the lighting in layers so the kitchen works from dawn prep to evening wash-up.
Start with task light: fit an enameled or prismatic glass pendant above the main table or central run, hung low enough to cut shadows but clear head height. Add discreet under-cabinet LED strips if you’ve got fitted units, or small wall-mounted goose-necks near the range for safe chopping and stirring.
For ambient glow, choose a simple milk-glass ceiling light or a wrought-iron lantern wired on a dimmer to tune the lighting ambiance. Use warm 2700K lamps, linen shades, and aged brass switches to keep Rustic charm without glare, and to flatter timber and stone.
Add Open Shelves and a Kitchen Dresser
Add rustic open shelving in pine or oak on stout brackets, keeping the boards shallow so they suit a period country kitchen and don’t swallow light. You’ll style everyday dishware on view—ironstone plates, crocks, and mugs—grouped by function and color so it looks lived-in rather than staged.
Restore a kitchen dresser by tightening joints, stripping back failing paint, and finishing it in a rubbed oil or traditional milk paint. Then use it as your working pantry.
Choose Rustic Open Shelving
While fitted wall cabinets read as modern convenience, rustic open shelving restores the working character a traditional country kitchen was built around.
Choose stout timber boards—pine, elm, or oak—planed flat but left with visible grain, then seal with oil or wax, not glossy varnish.
Support them on forged iron brackets, turned wooden corbels, or simple cleats, echoing utilitarian joinery used in larders and sculleries.
Keep shelf depths modest so they don’t dominate the room, and set heights to clear kettles and crocks.
If your walls are uneven plaster, scribe the back edge for a tight fit and fewer gaps.
You’ll gain Rustic charm without fuss, and your open shelving will feel properly rooted in place.
Style Everyday Dishware Display
Because a traditional country kitchen earned its keep through daily use, you should let everyday dishware live in plain sight on open shelves and a proper kitchen dresser rather than hiding it behind doors.
Group plates by diameter, then stack them upright in grooved plate racks or lean them against a back rail, as period joiners intended. Keep mugs on pegs beneath the shelf so steam-dried clay and ironstone air out between meals.
Mix Elegant tableware with sturdy whiteware, but repeat shapes to avoid visual clutter. Place Floral dishware on the highest shelf where light catches the glazing and pattern, echoing the hand-painted sprigs common in late Victorian transfers.
Add a few lidded crocks and a butter dish to signal workaday habits, not staged perfection.
Restore A Kitchen Dresser
Open shelves show off your daily plates and mugs, but a proper kitchen dresser gives them a period-correct home base and restores the working rhythm of a traditional country kitchen.
Choose a pine or oak dresser with a plate rack top and a base of deep drawers for linens and cutlery. Strip back later varnish, then repair loose joints with hide glue and clamp square.
Replace missing knobs with turned wood, not shiny pulls.
Finish it like a working house would’ve: brush on Vintage paint in thin coats, sanding lightly between, then wax for a soft sheen. For authenticity, keep wear at touch points—drawer edges, shelf fronts, and the bread-board area—so the distressed finish looks earned, not staged.
Add hooks inside for aprons and scales.
Use Hardworking Textiles (Curtains, Rugs, Linens)
If you want a traditional country kitchen to feel lived-in rather than staged, start with hardworking textiles that earn their keep every day. Choose unbleached linen or tightly woven cotton for café curtains; they’re period-true, wash well, and soften light without looking fussy.
Aim for Textile durability: flat-felled seams, sturdy hems, and tapes or rings that won’t tear when you tug them daily. Underfoot, pick a rag rug or narrow wool runner—both historically common and easy to beat out.
Keep linens in rotation: striped tea towels, check aprons, and heavy canvas oven cloths that protect hands and hooks.
Practice Pattern mixing with small checks, ticking stripes, and muted florals in one earthy palette. You’ll get warmth, grip, and honest wear.
Decorate With Vintage Finds Without Clutter
While you might love the charm of old crocks and enamelware, a traditional country kitchen looks best when every vintage find has a job and a clear place.
Choose a few honest workhorses: a stoneware crock for wooden spoons, a butter paddle in a small tray, or a labeled tin for tea.
Group antique accessories by task, not era, so the room reads as a working space, not a shop display.
Use vintage storage to reduce visual noise: lidded canisters for flour and oats, a bread box for loaves, and a wall-mounted plate rack to lift stacks off counters.
Keep finishes consistent—galvanized, pine, or cream enamel—and limit open shelves to what you use daily.
Rotate seasonal pieces into a cupboard.
Hide Modern Upgrades (Appliances, Outlets, Venting)
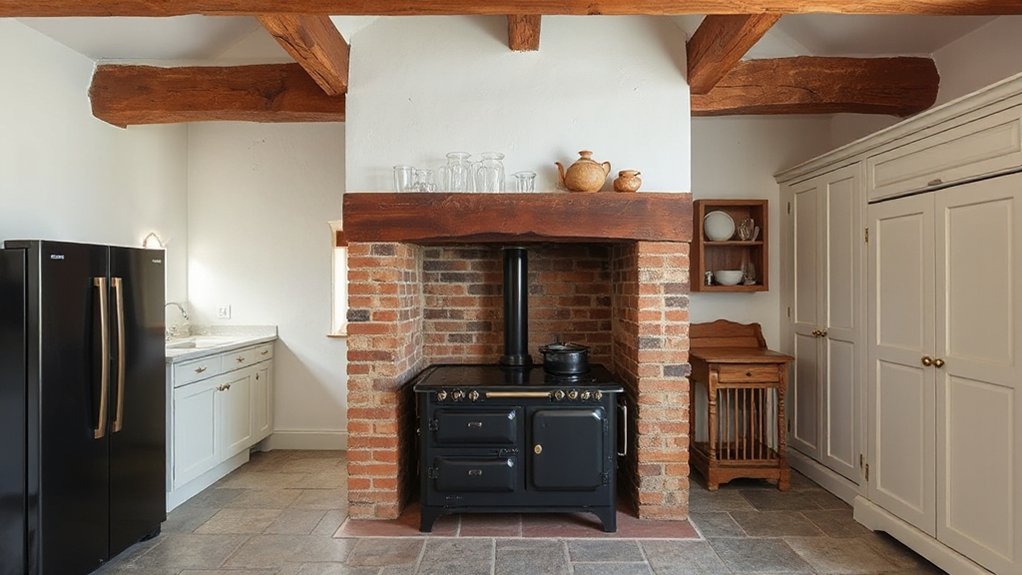
You can keep modern convenience without breaking a traditional country-kitchen look by camouflaging appliances behind paneled fronts, a painted icebox-style surround, or a curtain on a simple rod.
You’ll also want to place outlets with restraint—tuck them under wall cabinets, use paintable cover plates, or choose period-appropriate finishes so they read quietly against plaster, beadboard, or tile.
For venting, you can hide a hood with a wood mantel-style enclosure and run ductwork inside a soffit or chimney chase, leaving the room’s lines and joinery to take center stage.
Appliance Camouflage Strategies
Although a traditional country kitchen can welcome modern performance, the trick lies in letting period materials and joinery take the visual lead.
Prioritize hidden appliance placement: tuck a dishwasher behind a framed-and-panelled door with proper reveals, or recess a refrigerator into a run of pantry cupboards so its face aligns with stile widths.
Choose brass or iron pulls that match your latches, and keep door rails consistent with your original proportions.
For vintage appliance integration, select a range with enameled panels and simple knobs, then flank it with heat-tolerant beadboard or tiled cheeks that echo old hearth surrounds.
Build a shallow “appliance garage” for mixers and toasters, using a tongue-and-groove interior and a lift-up door.
Keep finishes matte, not glossy.
Discreet Outlet And Venting
Once the big appliances disappear behind frame-and-panel fronts, the next giveaways are the shiny outlet plates and bulky vents that interrupt old millwork. You’ll keep the period look by planning discreet outlet placement before trim goes on. Set receptacles under wall cabinets, inside appliance garages, or in the face frames of island panels, then finish them with paintable plates or aged brass that matches latches.
If you need countertop power, specify pop-up units in soapstone or butcher block so nothing reads “modern” at eye level. For venting system integration, run ductwork through a boxed beam, chimney breast, or pantry chase, and use a remote in-line fan to cut noise.
Choose a plastered hood or wood canopy that echoes historic mantels and hides baffles cleanly.
Frequently Asked Questions
Do I Need Planning Permission for a Country-Kitchen Restoration?
You don’t usually need planning permission, but you might if you alter structure, facades, or listed details. You’ll still meet building regulations, and historic preservation rules can require consent for windows, hearths, and joinery.
How Can I Make a Rental Kitchen Look Traditionally Country Without Renovations?
You can conjure a country kitchen by hanging Vintage textiles like gingham curtains and tea towels, adding Rustic lighting with enamel pendants, swapping hardware for brass, displaying crockery, and setting a scrubbed pine board.
What’s the Best Way to Budget for an Authentic Country Kitchen Makeover?
You’ll budget best by pricing essentials first, then staging upgrades: allocate 60% to repairs and cabinetry, 25% to Rustic color palettes and paint, 15% to Vintage accessories, sourced secondhand, crafted, and period-appropriate.
How Do I Restore Original Floorboards Safely and to Code?
Don’t cut corners: document species, check joists, then start floorboard restoration by pulling nails, sanding with HEPA extraction, and using low-VOC finishes. Follow safety precautions—lead testing, proper PPE, fire-safe rags—and meet local building codes.
Which Country-Kitchen Features Add the Most Resale Value?
You’ll boost resale most with restored wood floors, Shaker-style cabinetry, and a properly vented range hood; add Rustic lighting in period forms and Vintage textiles like linen curtains, valuing reversible joinery and original trim details.
Conclusion
When you restore a traditional country kitchen, you’re really tuning it like an old instrument. Start with honest finishes—tight-grained wood, reclaimed stone, burnished edges—then let muted greens and faded blues settle into the light. Hang open shelves on forged iron, set a dresser for crocks and linens, and choose ticking stripes that soften footsteps. Tuck modern appliances behind panels. You’ll end with a room that feels worked-in, repaired, and quietly enduring.