You’re about to turn a neglected outbuilding into a compliant, year-round office, but you can’t start with paint and furniture. You need to verify slab levels, wall integrity, roof load paths, and safe access, then map planning limits against Building Regs for insulation, fire safety, and electrics. Price the obvious work and the traps—damp remediation, new glazing, armoured data runs, and ventilation. Next, you’ll set the order of works, and that’s where most projects either stay on budget or drift…
Suitability Checklist: Space, Structure, Access
Before you spend money on drawings or insulation, run a suitability checklist that verifies the outbuilding can physically support office use.
Measure internal length/width, then set a minimum working zone for desk depth, chair clearance, and storage runs.
Confirm head height at the lowest point, and map window positions to control glare on screens.
Inspect foundations, wall plumb, roof sag, and timber decay; you’re looking for load paths you can rely on.
Check slab levels, damp staining, and ventilation openings, then note where services can route without cutting primary structure.
Validate access: door width, threshold step, and a safe path from the house.
Plot cable, drainage, and lighting routes to preserve garden aesthetics and outdoor landscaping sightlines.
Planning Permission vs Building Regs (UK)
Once you’ve confirmed the outbuilding’s dimensions, structure, and access work on paper, you need to lock down the legal framework that governs the build: UK planning permission and Building Regulations don’t cover the same risks, and you can trigger one without the other.
Planning controls use, siting, and external appearance: check permitted development limits, boundary offsets, ridge height, and whether you’re in a conservation area or on Article 4 land. If you change the building’s use or materially alter elevations, you’ll likely need an application, including drawings that protect garden aesthetics and coordinate with outdoor landscaping.
Building Regs focus on performance: structure, fire separation, insulation and condensation (Part L), ventilation (Part F), electrics (Part P), and drainage if added. Submit a Full Plans package or use Building Notice, and schedule inspections.
Rough Costs and Hidden Budget Traps
Although the shell of a disused outbuilding can make the project look like a “cheap conversion,” your budget will swing on the scope lines you draw for fabric upgrades, services, and compliance work. For cost estimation, break the drawing set into work packages: structure, envelope, openings, MEP, finishes, and fees, then add a measured contingency (10–20%) keyed to unknowns in the survey.
Typical budget pitfalls include underspecified insulation/U-values driving thicker build-ups and lost floor area; damp remediation behind linings; foundation or slab upgrades after trial pits; trenching and capacity for power, data, and drainage; new glazing to safety/thermal specs; fire separation and escape requirements; acoustic treatment; and professional costs (engineer, SAP, Building Control, test certificates).
Include prelims, waste, and access constraints.
Best Order of Work for the Conversion
After you’ve pinned down allowances and contingency, lock in a sequence that protects the weatherproof shell, keeps inspections on track, and avoids rework. Start with measured surveys, as-built drawings, and a set-out grid; confirm floor levels, door swings, and desk wall runs.
Then clear the site, plan skips, and establish temporary power and safe access routes.
Next, schedule structural alterations, new openings, and any underpinning before first-fix services. Run electrics, data, and ventilation paths while framing is open, then call required inspections.
Follow with insulation, vapour control, and internal linings, then second-fix sockets, lighting, and cabinetry.
Finish with floor finishes and paint, then complete external paths, thresholds, outdoor landscaping, and garden aesthetics alignment.
Stop Damp, Leaks, and Drafts First
Before you touch insulation or electrics, chase down every moisture and air path in the existing shell so you don’t trap damp behind new linings.
Start with the roof: replace slipped tiles, renew flashing, and test gutters and downpipes with a hose to confirm clear discharge away from the slab.
Inspect masonry joints and crack-map elevations; repoint with compatible mortar, then apply exterior sealing to porous brick, concentrating on windward faces.
At openings, reset frames, tape perimeter gaps, and fit compression seals; add a drip edge and check sill fall.
Inside, locate condensation versus ingress using moisture readings and salt staining.
Install moisture barriers only where detailing prevents bridging and includes lapped, taped joints.
Finally, seal service penetrations and floor-to-wall junctions to stop drafts.
Insulate Floors, Walls, and Roof Properly
Once you’ve sealed the building envelope against moisture and air leakage, you can specify insulation as a continuous layer across the floor, wall, and roof planes with no thermal bridges at junctions.
Detail floor insulation first: install rigid foam above a slab with taped seams and a perimeter upstand, or mineral wool between joists with an underside air barrier and service void.
At wall bases, carry insulation past the sole plate and tape to the floor layer to maintain continuity.
For walls, use dense batts or boards sized to studs, then add a continuous internal layer to break stud bridging.
At the roof, fit insulation to the rafter line, maintain a clear ventilation channel, and set soffit-to-ridge roof ventilation to protect sheathing and prevent condensation.
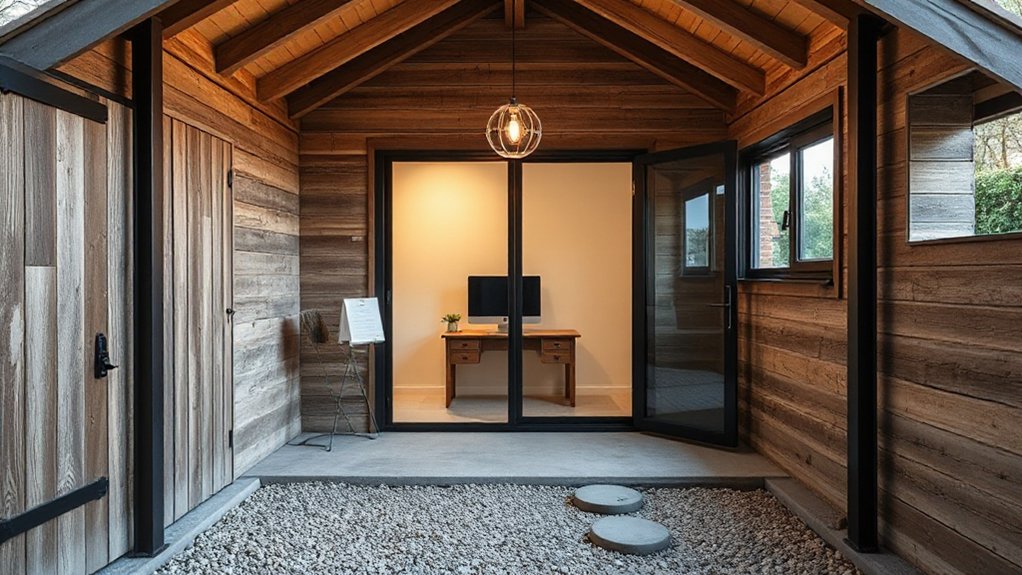
Windows, Doors, and Security Upgrades
You’ll spec office-ready windows by setting target U-values, glazing type, and ventilation/trickle-vent requirements. Then, size openings to structural lintels and interior sightlines.
You’ll choose an exterior-rated door with a multipoint lock, set a level threshold, and detail continuous weatherstripping plus airtight sealing at the frame-to-wall junction.
You’ll harden the envelope with hinge bolts, laminated glass where needed, and a wired alarm/contact-sensor plan with protected cable routes and a battery-backed control unit.
Choosing Office-Ready Windows
Although the wall framing and insulation set your baseline comfort, office-ready windows, doors, and security upgrades determine daylight control, thermal performance, and break-in resistance in a converted outbuilding.
Specify window material by exposure: uPVC for low maintenance, timber-clad aluminum for durability with interior warmth.
Size openings from your desk plan; keep sill heights above 900 mm to preserve wall space and power runs.
Choose glazing options by orientation: low‑E argon double glazing as minimum; triple glazing on north elevations or noisy sites.
Add warm-edge spacers and thermally broken frames to prevent condensation at reveals.
Detail trickle vents or a dedicated air inlet to meet background ventilation without drafts.
Use laminated inner panes, lockable handles, and hinge-side security bolts on opening sashes.
Door Selection And Sealing
Windows handle most of your daylight and heat loss, but the door assembly sets the real air‑tightness line and the first security barrier. Specify a prehung exterior unit so the frame, threshold, and seals align to a single tolerance stack.
Choose door materials by exposure: insulated steel for stability, fiberglass for low maintenance, or engineered timber with a protected bottom rail.
Set the sill on a level, fully supported bed and add a sill pan with end dams to route water outward.
Use sealing techniques in layers: backer rod and low‑expansion foam at the jamb gap, then tape or liquid flashing to the WRB.
Install continuous compression weatherstrips, an adjustable threshold, and a sweep to close the final leakage path.
Security Hardware And Alarms
Where does the break‑in risk actually concentrate in a converted outbuilding office—at the latch, the glazing, and the blind spots around the perimeter? You’ll harden those points in the same order you’d detail a section drawing: door set, window set, then surveillance coverage.
Specify a 3‑point locking eurocylinder with anti-snap and a 1.5mm steel strike box into the stud or masonry return. Add hinge bolts and a door viewer; keep fixings concealed.
For windows, use laminated P4A glazing, internal beading, and keyed sash restrictors; pair with security film only as a secondary layer.
Run magnetic contacts to the panel, plus a shock sensor on glazing. Place security cameras at soffit corners, overlapping fields.
Integrate PIRs and alarm systems with battery backup and cellular failover.
Electrics, Lighting, and Broadband Setup
You’ll start by specifying a dedicated feed from the main board to a small consumer unit in the outbuilding, sized for your ring or radial circuits, RCD/RCBO protection, earthing, and any required bonding.
You’ll then draft a lighting plan that fixes luminaire positions, switching points (including 2-way where needed), circuit segregation, and cable routes to keep runs short and serviceable.
Finally, you’ll map broadband from the router to a hardwired termination (Cat6 or fibre), set conduit and back boxes, and keep data lines separated from mains to control interference.
Safe Wiring And Consumer Unit
Before you close up walls or install insulation, lock down a compliant electrical plan: specify the supply route from the main house, the SWA cable size and burial depth, the earthing arrangement (TT or exported PME where permitted), and a dedicated outbuilding consumer unit with RCD/RCBO protection, main isolator, and surge protection sized to the load schedule.
Document circuit safety with a single-line diagram, breaker ratings, and maximum demand. You’ll size finals for sockets, fixed equipment, and any heater, then confirm Zs, R1+R2, insulation resistance, and RCD trip times meet regs.
Route cables in prescribed safe zones, set correct IP-rated glands, and bond any extraneous-conductive parts. Plan wiring upgrades by leaving spare ways, labeling circuits, and providing testable isolation at the entry point.
Lighting Plan And Broadband Wiring
Once the supply and consumer unit spec are fixed, map your lighting and data layout like a mini services drawing: set luminaire positions and switching logic (1‑way/2‑way, PIR, or smart control), choose circuits (e.g., 6A/10A RCBO lighting radial plus a separate external light feed), and lock in cable routes through safe zones to each switch drop and ceiling/roof void point.
Align fittings to your desk line so natural light isn’t blocked; specify dimmable 4000K LEDs plus task lighting over the worktop. Mark IP ratings for damp thresholds and note emergency egress illumination if required.
For broadband, pull Cat6 in conduit to a comms point with a double RJ45 and a nearby twin socket; keep separation from mains, avoid tight bends, and label both ends at the patch panel/router.
Heating and Ventilation for Year-Round Use
Although a well-insulated outbuilding slows heat loss, you’ll still need a defined heating load and controlled air exchange to keep the office stable through winter cold and summer humidity.
Calculate design watts from floor area, U-values, and local winter ΔT, then size emitters with 10–15% margin.
Your heating options include electric panel radiators for simple zoning, hydronic loops if you can extend the house circuit, or a mini-split heat pump for efficient heating and cooling.
Run dedicated circuits and fit a programmable thermostat at desk height, away from drafts.
For air quality, specify ventilation systems that deliver 0.5–1.0 ACH: a trickle-vent plus extract fan, or balanced MVHR with insulated ducts.
Maintain slight positive pressure and include humidity sensing.
Layout, Storage, and Noise Control for Calls
You’ll start with a scaled floor plan that fixes desk location, chair clearance, and cable routes while keeping door swing and window lines unobstructed.
You’ll build storage as shallow wall runs—overhead cabinets, a tall utility bay, and under-desk drawers—so the primary work zone stays clear and circulation remains at least 800–900 mm wide.
For call-ready acoustics, you’ll add sealed solid-core doors, gasketed frames, and decoupled wall/ceiling layers with mineral wool plus acoustic panels to cut reflections at the mic position.
Space Planning Essentials
Before you buy furniture or run cabling, lock in a scaled layout that fixes three variables: circulation, storage volume, and an isolated call zone.
Draft at 1:50, plot door swing, window lines, and a 900 mm clear route from entry to desk.
Align the primary work wall to preserve garden aesthetics and support landscaping integration through sightlines, not clutter.
Size storage by inventory: allocate linear metres for files, closed cabinets for tech, and a dedicated charging bay.
Keep tall units on the cold wall to reduce glare and free window areas.
Place the call zone opposite hard openings, with a high-back chair and a shallow return table, so you can pivot to calls without crossing traffic or exposing background mess.
Mark power, data, and lighting points on plan.
Call-Ready Soundproofing
Once your plan fixes circulation and storage, tune the room for calls by treating sound as a layout and joinery problem, not an afterthought. Place your desk on an internal wall, not the door wall, so your mic faces absorption.
Build storage as mass: full-height cabinets with sealed backs and soft-close hardware reduce rattle and add damping. Specify a solid-core door with perimeter seals and a drop threshold; add a lined vestibule if you can spare 900mm depth.
For the envelope, use double-layer plasterboard on resilient channels, mineral wool in stud bays, and acoustic mastic at all junctions.
For call ready soundproofing, combine these noise reduction techniques with thick curtains, carpet tiles, and a ceiling cloud to control reflections and improve voice intelligibility.
Frequently Asked Questions
Can I Claim the Conversion Costs as a Business Expense for Tax?
You usually can’t claim conversion costs as Business expenses; they’re capital improvements, not immediate Tax deductions. You can deduct a pro‑rata share of ongoing use costs if you document exclusive business use, floor area, and apportionment.
Will Converting the Outbuilding Affect My Home Insurance Premiums or Cover?
Yes, it can—your insurer may raise premiums or limit cover unless you disclose the conversion’s Design aesthetics, new wiring, and insulation materials. Update rebuild value, fire/security measures, and any business-use endorsements. Get it endorsed.
Do I Need Party Wall Agreements if It’s Near a Neighbour’s Boundary?
You’ll need a Party Wall Agreement if works fall under boundary regulations: excavating within 3m, cutting into, raising, or rebuilding the shared boundary wall. You must issue neighbour notifications with drawings, sections, and start dates.
How Can I Soundproof the Office to Avoid Disturbing Family or Neighbours?
Want silence? You’ll decouple walls with resilient channels, add mineral wool, double-layer acoustic drywall with damping compound, and seal flanks. Specify soundproofing techniques: solid-core door, acoustic glazing; choose noise reduction materials: mass-loaded vinyl, neoprene gaskets.
Can I Run Client Meetings There Without Changing the Property’s Use Class?
You can, if meetings stay incidental to home working; frequent client traffic may trigger a use-class shift. Check Planning permissions and Building permits for access, parking, fire egress, occupancy limits, and signage controls.
Conclusion
Tick off the checklist, lock down permissions, and you’ll turn dead space into working square metres. Sequence the build like a drawing set: damp-proofing first, then envelope upgrades, then services—power, lighting circuits, CAT6/fibre—then HVAC balance and finishes. Specify secure doors, laminated glazing, and tested locks. Control moisture, temperature, and noise, and you control productivity; neglect them, and they control you. You’ll end with a compliant, efficient office you can use year-round.