You catch the raking light and see every crack and crater telegraphing through the paint. You don’t guess—you identify the defect type, pick the correct compound, tape, and patch method, and prep the substrate so the repair bonds and stays stable. You keep edges sound, fasteners set, seams reinforced, and finishes feathered to meet common drywall standards. Next, you’ll decide which repairs need flexibility versus structure, because that choice controls everything.
Identify the Crack or Hole Type Fast
Before you grab compound or tape, classify the defect by size, depth, and movement, because the repair method has to match the failure mode.
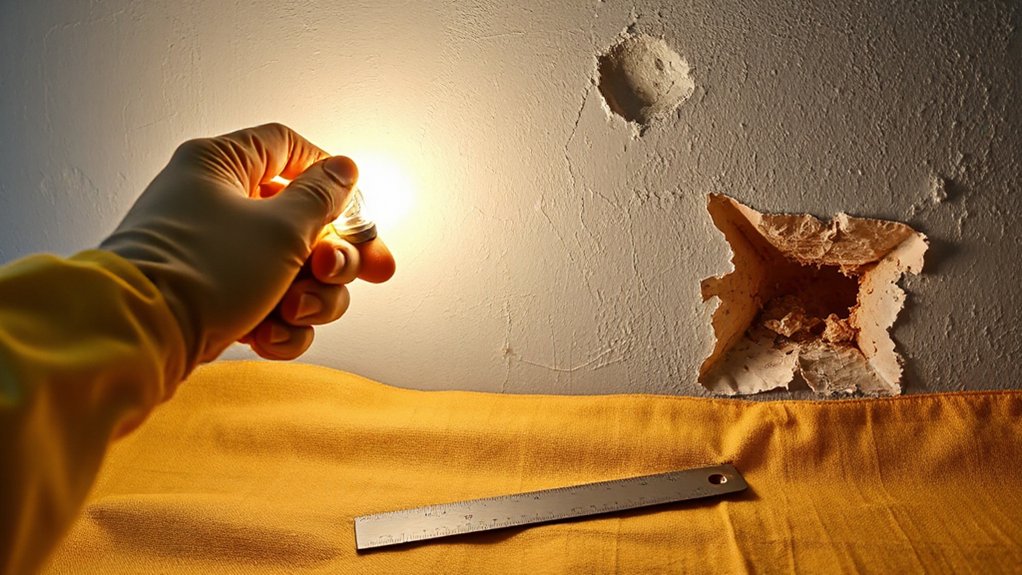
Measure width: hairline (<1/16 in), moderate (1/16–1/8 in), or wide (>1/8 in).
Probe depth with a putty knife to confirm surface checking versus through-crack into substrate.
Check for crack expansion by marking ends and rechecking after 24–48 hours; movement suggests framing deflection, seasonal shrinkage, or vibration.
Identify pattern: straight at joints, diagonal from corners, or spiderweb over plaster.
For holes, note diameter and whether edges are crushed, paper-delaminated, or backed by lath.
Evaluate moisture impact: staining, soft gypsum, mildew odor, or elevated meter readings.
Stop and correct sources before repair.
Choose the Right Drywall Patching Materials
Once you’ve matched the defect to its size and movement, select patching materials that meet ASTM/GA standards and fit the substrate so the repair bonds, spans, and finishes without telegraphing.
Use setting-type joint compound (ASTM C475) for deep fills and fast recoat windows; use drying-type compound for final skim and blending.
For hairline cracks, embed paper tape (GA-216) in compound; for corners, use metal- or paper-faced bead.
For holes up to 6 inches, install a drywall patch of matching thickness (1/2 or 5/8, Type X where required) plus joint tape; for larger openings, match board type and fastener schedule.
Match Drywall textures with compatible topping and additives.
Replace disturbed Wall insulation with like R-value, fire rating, and vapor retarder class.
Prep the Wall for a Drywall Patch That Holds
Before you patch, you’ve got to prep the substrate so the repair meets manufacturer specs and holds long-term. Scrape out all loose gypsum, paint, and crumbling edges. Then vacuum and wipe the area to remove dust and contaminants.
Prime any exposed paper or porous core with a drywall sealer/primer and let it dry fully before you apply compound or set the patch.
Clear Loose Material
Although it’s tempting to start patching right away, you’ll get a stronger, code-sound repair by clearing all loose material first. Start by scoring the perimeter with a sharp utility knife so you don’t tear the paper face beyond the repair area. Scrape away loose paint with a putty knife until you hit firmly bonded edges.
For cracked drywall, widen hairline cracks into a shallow “V” so compound can key in, then remove all friable gypsum. Cut out any soft, crushed, or delaminated drywall paper; don’t bridge over damaged substrate.
If the hole has torn edges, square them with a drywall saw so your patch bears on solid material. Vacuum dust as you work, and stop once every edge feels rigid and sound.
Clean And Prime Surface
After you’ve removed all loose material, clean the exposed drywall and surrounding paint so the patch bonds to a stable, contaminant-free surface. Vacuum dust from the cavity and feathered edges, then wipe with a damp, lint-free cloth. If you’ve got grease or smoke residue, wash with a TSP-substitute and rinse; let it dry fully. Keep water out of electrical boxes and don’t soak paper facing.
For proper Surface preparation, dull glossy paint by scuff-sanding 120–150 grit, then vacuum again. Seal torn drywall paper and chalky compound with a PVA or shellac-based sealer.
Follow with primer application: brush a thin coat onto raw gypsum and the sanded perimeter, extending 2–3 inches past the repair. Allow manufacturer cure time before applying compound, tape, or a patch.
Fix Hairline Cracks With Flexible Joint Compound
Before you patch, you identify what’s driving the hairline crack—seasonal movement, minor settlement, or a drywall joint that wasn’t taped to spec—so you don’t lock in recurring failure.
You then apply a flexible joint compound in thin, controlled passes, tooling it tight to fully bridge the fissure without excess buildup.
After it cures per manufacturer instructions, you sand to a feathered edge and blend the repair flush so it disappears under primer and finish paint.
Identify Hairline Crack Causes
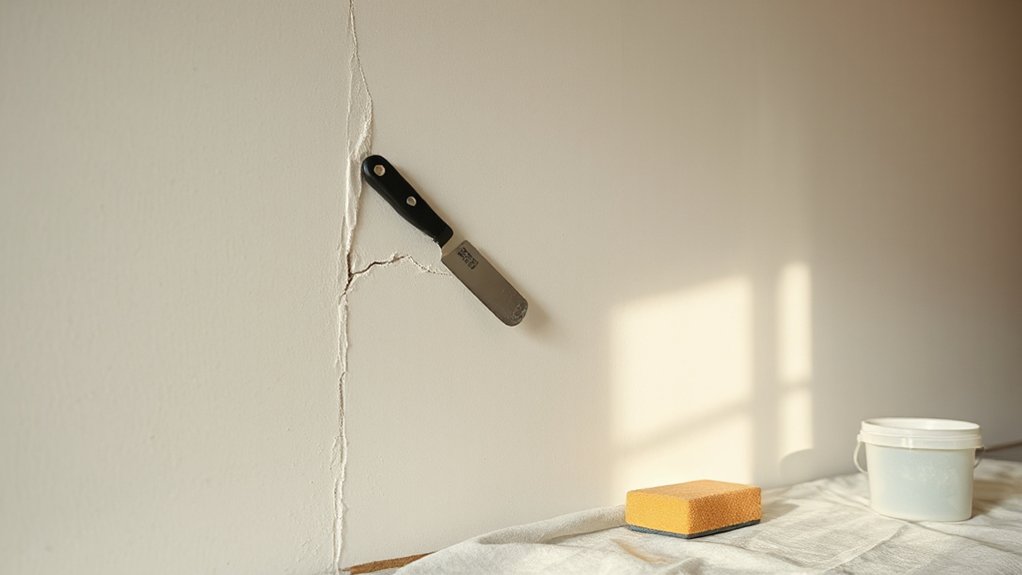
When you spot a hairline crack in drywall or plaster, treat it as a movement issue first, not a surface defect. Map the crack’s path: straight lines at corners often indicate framing movement; stair-step cracks in plaster can indicate lath stress. Measure width (use a feeler gauge); anything growing beyond 1/16 in. suggests ongoing movement that you shouldn’t conceal.
Check for moisture issues per code-required building envelope control: inspect exterior penetrations, roof flashing, window heads, and plumbing runs. Use a moisture meter at the crack and adjacent studs. Compare wall texture changes: bubbling paint, efflorescence, or soft joint compound points to wetting, not settlement.
Verify fastener pops, loose baseboard, or door misalignment to confirm structural shift before repairs.
Apply Flexible Joint Compound
Once you’ve confirmed the crack isn’t actively widening and moisture isn’t driving the failure, repair it with a flexible joint compound that can tolerate minor seasonal movement.
Open the hairline slightly with a utility knife to form a shallow V-groove, then vacuum dust and wipe clean.
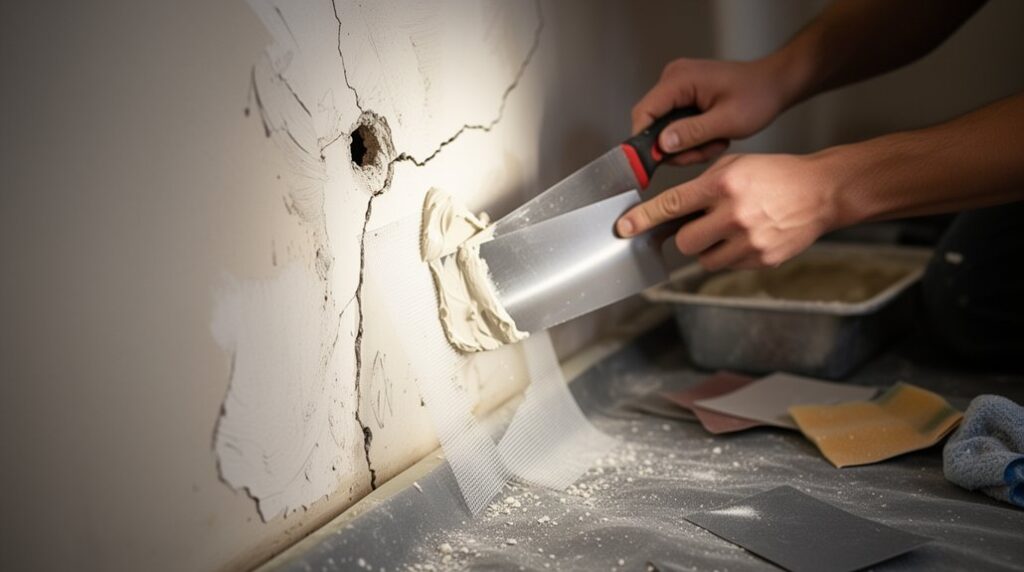
If the crack crosses a drywall joint, apply paper tape or fiberglass mesh per manufacturer instructions to maintain code-aligned joint treatment.
Load a 4–6 inch taping knife and force flexible joint compound into the groove, working from both directions to eliminate voids.
Feather the edges tight to the wall to reduce ridging.
For crack stabilization, embed tape while the compound is wet and immediately top-coat to lock it in.
Let it cure fully per label before proceeding.
Sand And Blend Seamlessly
After the flexible compound cures to the manufacturer’s stated recoat time, sand the patch to a flush plane so the repair disappears under finish. Use a 120–150 grit sanding sponge for the first pass, keep pressure light, and feather 6–10 inches past the crack to avoid a dish.
Confirm the surface is smooth by raking light; correct highs with sanding, lows with a tight skim coat, then re-sand at 180–220 grit. Vacuum dust and wipe with a damp microfiber so primer bonds per label instructions.
For Texture matching, replicate knockdown, orange peel, or skip-trowel with the same tool and dry time. Prime patched areas, then execute Paint blending by boxing paint and rolling edge-to-field. Match sheen exactly.
Patch Nail Pops So They Don’t Come Back
Although a “nail pop” looks like a simple bump or crack in the drywall, you won’t stop it from returning unless you re-secure the board to the framing before you patch. Locate the stud with a magnet or finder, then drive two 1-1/4 in. drywall screws into sound framing, one 1–2 in. above and one below the pop, dimpling paper without tearing it (per gypsum board fastening practice).
Back out the popped nail or set it below the surface. V-cut loose paper, seal exposed gypsum with primer, then apply setting-type compound in thin coats. Embed mesh or paper tape if the crack radiates.
Sand flush, prime, and finish with drywall texture matching for Nail pop prevention.
Patch Small Drywall Holes (Up to 1/2) Cleanly
Because small holes don’t compromise drywall strength, you can repair anything up to about 1/2 in. without a patch by building a solid, sealed fill.
Ream ragged edges with a utility knife, then lightly undercut the paper so compound keys in. Vacuum dust and spot-prime exposed gypsum to prevent flashing and meet manufacturer requirements.
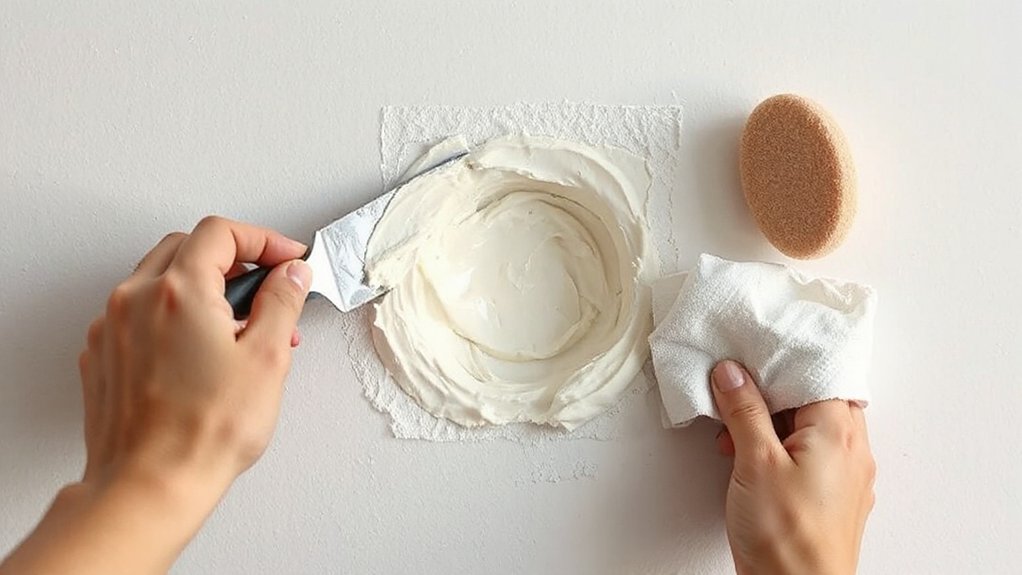
Pack setting-type joint compound with a putty knife, pressing firmly to eliminate voids, and leave it slightly proud. After it sets, skim with lightweight compound, feathering 6–8 in.
Sand with 180–220 grit, keeping the surface flat. Match existing drywall texture with a controlled stipple or spray, then re-prime.
Finish with paint blending: extend finish paint beyond the repair and maintain wet edges. Inspect under raking light before cleanup.
Repair Medium Holes With a Drywall Patch Kit
For medium drywall holes, you’ll get the most reliable repair by selecting a patch kit sized to span solid, intact gypsum and meet the manufacturer’s installation requirements.
You’ll prep the area by cutting to a clean, square opening, removing loose material, and keeping edges sound, dry, and dust-free for proper bond.
Then you’ll set the patch per the kit instructions and apply joint compound in thin, feathered coats to build a flush, code-acceptable surface ready for sanding and finish.
Choose The Right Kit
When you’re repairing a medium hole (roughly 2–6 inches across) in drywall, pick a drywall patch kit that includes a self-adhesive mesh or metal patch, setting-type joint compound, a 4–6 inch taping knife, and sanding media so you can rebuild the surface to a paint-ready plane.
Match the patch to your drywall thickness (typically 1/2 or 5/8 inch) so the repair meets fire-rating and stiffness expectations. Choose metal for flatter walls and higher impact areas; use mesh for faster embedment on lightly stressed partitions.
Verify the compound is setting-type (not premixed) for controlled cure and reduced shrinkage. Confirm the knife width can feather edges without overbuilding.
Select sanding grits that let you replicate existing wall texture without gouging. Choose reputable, labeled components.
Prepare The Damaged Area
Before you stick on a mesh or metal patch, square up the damage and prep the substrate so the repair bonds and stays flush. Cut back to solid drywall with a utility knife and straightedge, forming a clean rectangle or circle; remove all loose gypsum and torn paper.
Verify the opening doesn’t intersect wiring or plumbing; if it might, de-energize the circuit and inspect per local code.
Scrape away high ridges and old joint compound 2–3 inches beyond the perimeter, then feather-sand to a flat plane without polishing the face paper.
Vacuum dust and wipe with a barely damp cloth.
Check for moisture issues (staining, softness, mold) and correct the source before repair.
Protect decorative finishes with tape and drop cloths.
Apply Patch And Compound
After the opening is clean, dry, and squared to sound drywall, center a self-adhesive mesh (or metal) patch from the kit over the hole and press it tight so it fully bridges onto solid board on all sides.
With a 6-inch knife, apply setting-type joint compound, forcing it through the mesh and feathering 2–3 inches past the patch. Keep the first coat thin to prevent sagging and to maintain a flat plane.
After it sets, scrape ridges, then add a wider second coat with a 10–12 inch knife, feathering edges for a seamless gradual.
If required by local practice, use setting compound for moisture prevention in damp areas, then prime before matching drywall texture.
Sand lightly between coats with dust control.
Patch Large Drywall Holes With a Backer Board
Although small dings accept spackle alone, a large drywall hole needs solid backing to meet typical repair standards and prevent future cracking.
Square the opening to sound gypsum, then cut a 1×3 or plywood backer 2–4 inches longer than the hole’s width. Slip it behind the drywall, center it, and fasten through the existing face with two drywall screws per side, staying 3/8 inch from edges to avoid blowout.
Cut a new drywall plug to fit with 1/8-inch gaps, then screw it to the backer. Tape joints with paper tape in setting-type compound for strength.
Prime exposed paper to aid moisture prevention and assure the final drywall texture matches adjoining surfaces.
Sand, Feather, and Blend Your Drywall Patch Edges
With the backer board installed and the drywall plug taped and mudded, you’re ready to finish the repair so it disappears under paint and meets typical flatness expectations.
Let the compound dry fully per the manufacturer, then sand with 120–150 grit on a sanding block, keeping strokes wide to avoid gouges. Use a raking light to spot ridges and tool marks.
Apply a thin skim coat, feathering 8–12 inches past the repair, and keep edges tight so you don’t build a hump. After drying, sand again with 180–220 grit and vacuum dust to protect adhesion.
Check flatness with a straightedge; recoat if you see depressions.
For Drywall texture, leave a uniform, scuff-sanded surface that’ll accept paint matching later.
Prime and Paint So the Drywall Patch Disappears
Where do most drywall patches give themselves away under paint? At the sheen break: joint compound absorbs differently than face paper and leaves a dull “halo.” To prevent that, prime the entire repair plus 6–12 inches beyond it. Use a PVA drywall primer on bare paper and compound; it seals porosity and meets typical interior finish requirements.
If you’ve got stains or water history, switch to a stain-blocking primer and correct the source first for code-compliant drywall maintenance.
After priming, inspect under raking light and spot-fill pinholes, then re-prime those spots. Match the wall’s paint type and sheen exactly. Cut in and roll to the nearest corner or trim break to avoid lap lines.
Finish with two coats for uniform film build and home improvement results.
Frequently Asked Questions
How Long Should a Drywall Patch Cure Before Painting?
Let your drywall patch cure 24 hours minimum, or 48 hours for deep fills, before painting. For code-compliant drywall repair techniques, verify hardness and dryness. Follow painting preparation tips: sand smooth, remove dust, prime patched areas.
Can I Patch Drywall Without Sanding to Avoid Dust?
Yes, you can, but it’s like skating on thin ice. Use dust-control drywall joint compound and tight patching techniques: knife smooth, feather edges, wipe with damp sponge. Prime to code-approved spec. Expect minor touch-ups.
What Causes Recurring Cracks Even After a Proper Repair?
Recurring cracks happen because your substrate keeps shifting: Structural movement from settling, framing deflection, or inadequate fasteners; and Moisture issues that swell drywall and compound. You’ll need to correct causes, then re-tape per manufacturer specs.
How Do I Match Existing Wall Texture After Patching?
Of course you’ll match it by not guessing: test-spray or knife-stipple on scrap, then use texture blending in light passes. Prime first, then adjust nozzle, mud thickness, and trowel angle until finish consistency matches.
Is It Safe to Patch Drywall That Shows Water Damage or Mold?
You shouldn’t patch drywall with water damage or suspected mold until you’ve fixed leaks and completed mold remediation. Remove and replace compromised board, dry framing to code limits, then patch. If extensive, call a pro.
Conclusion
Once you’ve identified the defect, matched the compound, and built the patch with proper backing and tape, you’re finishing like a tradesperson, not a gambler. Feather your coats, sand to a uniform plane, and verify the surface is clean, dry, and sound. Prime to seal porosity, then paint to the original sheen. Like Theseus leaving no thread behind, you’ll erase the repair line and restore a code-worthy, continuous wall surface.