You probably don’t know this, but industrial steampunk isn’t built on gears—it’s built on restraint. You start with an honest shell: exposed brick, scarred wood, and raw metal that looks like it’s survived a few decades of hard use. You keep the palette smoky and warm, then let brass and iron do the talking in small, deliberate hits. The trick is choosing one heavy statement piece that makes the room feel engineered, not dressed up…
Build the Industrial Steampunk Base (3 Rules)
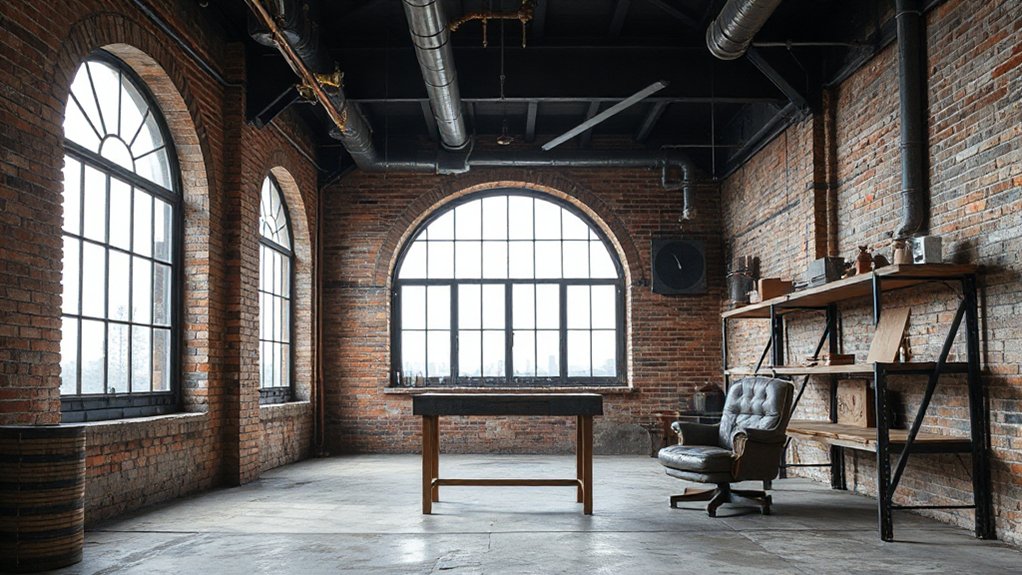
Before you hang a single brass gear or Edison bulb, you’ve got to lay down an industrial steampunk base that can take a beating and still look like it rolled out of a soot-stained workshop.
Rule one: expose the bones—brick, concrete, riveted steel, raw timber—then seal them so grime reads as patina, not neglect.
Rule two: choose honest, overbuilt furniture forms: stout worktables, cast-iron legs, factory carts; keep lines utilitarian, ready for Retro futuristic motifs later.
Rule three: layer texture like history—distressed leather, worn canvas, hammered metal, oily wood grain—so every surface feels handled.
Let Victorian influences show through in silhouettes and joinery, not frills.
You’re building a deck for invention, not a costume set.
Pick an Industrial Steampunk Color Palette
Now that your workshop bones are exposed and sealed, let color do the soot-and-brass storytelling. Start with coal blacks and engine greys to ground the room and make every edge feel forged. Layer tobacco browns and worn-velvet oxblood for warmth without sweetness.
Then strike with brass, copper, and verdigris accents—small hits that read like machinery catching lamplight.
Use Color psychology to steer the mood: black tightens focus, grey calms the noise, and deep reds raise the pulse like a boiler waking up.
Let Historical influences guide your shades—Victorian inks, railway soot, maritime patina, and old map sepias. Keep your palette restrained, then repeat it across walls, trim, and hardware so the space feels engineered, not decorated.
Use Signature Materials: Brick, Wood, Leather
Although paint sets the mood, brick, wood, and leather give your industrial steampunk room its spine. Let exposed brick stay rough and honest; seal it lightly so soot and time don’t crumble it. You’ll get Signature textures without losing the scarred, foundry feel.
Bring in wood that looks worked, not polished—reclaimed planks, butcher-block tops, worn beams. Stain it deep, keep the grain loud, and choose pieces that can take dents with pride. That’s Material durability you can feel every time you drag a chair.
Finish with leather: cracked club chairs, strap details, trunk handles, or a stitched bench. Pick thicker hides in tobacco, oxblood, or soot-brown so they age like a well-read ledger.
Choose Metal Finishes (Brass, Iron, Copper)
Three metals do most of the heavy lifting in industrial steampunk: brass for that lamp-lit glow, iron for hard factory grit, and copper for a worn, engine-room burn.
You’ll get the best results when you treat Metal finishes like a palette, not a pile—pick one to lead, one to back it up, one to accent.
Let brass show up on pulls, edging, and valve-like hardware, then knock it down with a brushed or antiqued patina. Bring in iron through riveted brackets, pipe rails, and blackened frames; choose matte over glossy so it reads forged, not flashy.
Add copper in measured hits—bands, countertop details, or aged panels—then let oxidation and heat marks tell the story. Keep Industrial metals consistent across rooms.
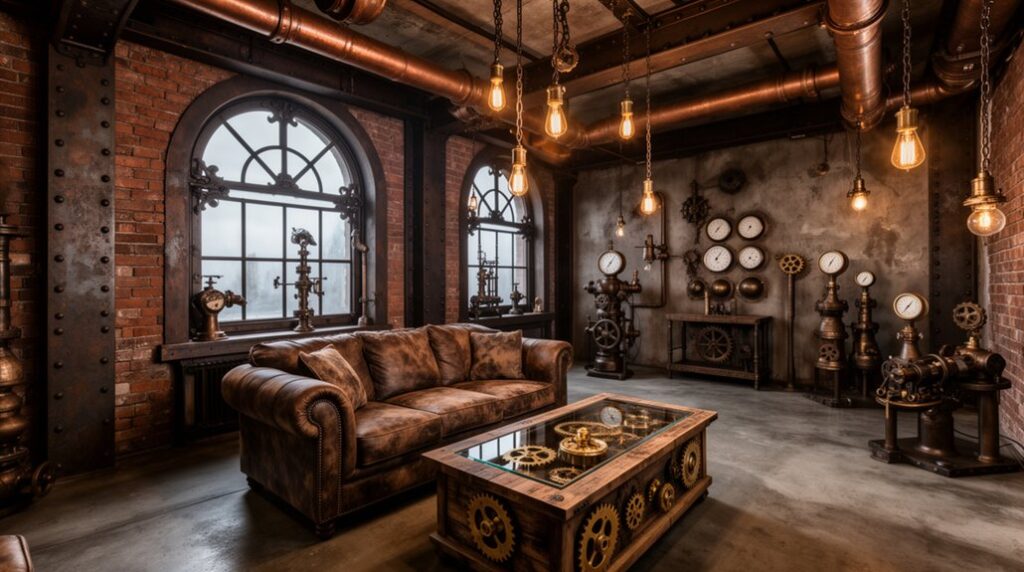
Industrial Steampunk Lighting: Fixtures + Bulbs
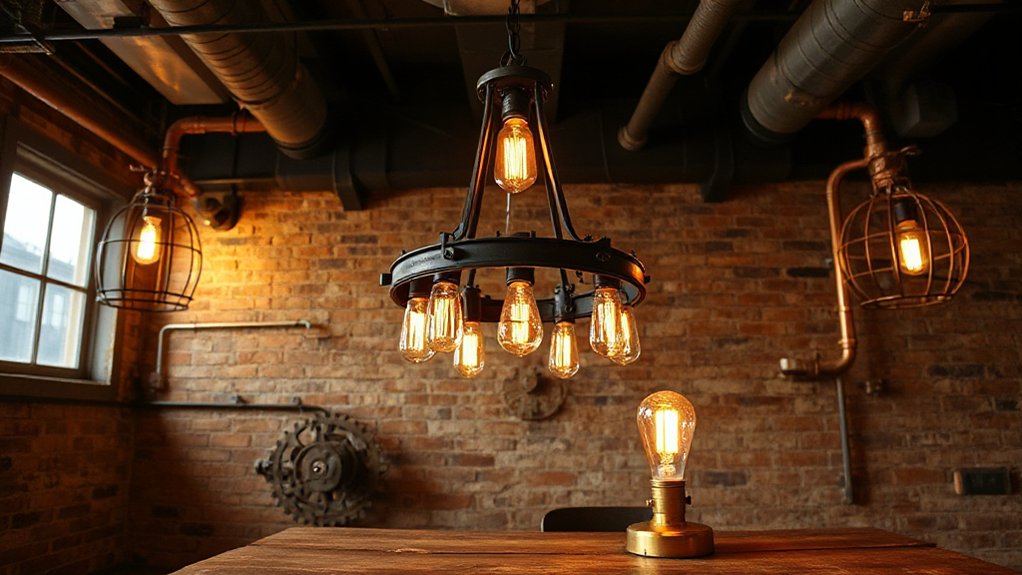
You’ve picked your brass, iron, and copper—now you need light that looks forged in a back-alley workshop. Hang vintage-inspired fixtures like caged pendants, pulley sconces, and pipe chandeliers, then crown them with exposed Edison bulbs in warm amber for that smoky glow.
Build it in layers: a low, steady ambient wash, hard-edged task beams where you work, and a few dramatic accents that throw shadows like machinery.
Vintage-Inspired Fixture Styles
When the room’s all brick, rivets, and soot-stained steel, the lighting has to pull its weight. You don’t hang anything delicate; you bolt up hardware that looks rescued from a shipyard and tuned in a back-alley workshop.
Lean into Vintage inspired fixture styles: caged pendants with bruised brass, factory domes in enamel black, and pulley suspensions that feel like they’ve hauled cargo for decades. Mount swing-arm sconces with knurled joints so you can aim light like a machinist at the lathe.
Try pipe-and-flange ceiling rigs, riveted bulkheads, or wire-guarded floods that read like old rail depots. With Steampunk lighting, you’re not just illuminating—you’re staging a gritty, clockwork mood, one hard-edged silhouette at a time.
Exposed Edison Bulb Choices
Because the bulb sits out in the open like a working part, your Edison choice can’t be an afterthought—it’s the filigreed engine at the center of the glow.
Pick warm glass, 2200K–2700K, so the light reads like amber liquor through soot.
Start with Edison bulb styles that match your metalwork: ST64 teardrops for factory grit, G95 globes for locomotive roundness, tubular T10s for lab-bench edge.
Go clear when you want every coil on display; go smoky or amber when you want the glow to feel aged, like brass left in rain.
Choose dimmable LEDs if you hate heat but still crave character.
For true nostalgia, hunt vintage filament options—squirrel-cage, spiral, or harp—so the bulb looks engineered, not generic.
Layered Ambient Task Lighting
Although a single Edison bulb can steal the scene, industrial steampunk rooms live or die by layers: a low, smoky ambient wash to stain the walls, focused task light that hits worktops like a welder’s arc, and a few hard-edged accents to rake across gears, rivets, and pipe.
Hang caged pendants on dimmers for that soot-gold glow, then aim an articulated brass sconce at your desk, bench, or bar so you can actually build, write, or pour.
Add a narrow-beam spotlight to pick out a valve wheel or framed blueprint.
You can keep the chaos controlled with a minimalist approach: fewer fixtures, better placement, tighter beam angles.
Hide modern technology in smart dimmers and warm LEDs tuned to filament color, so the mood stays antique, not harsh.
Furniture Essentials: Seating, Tables, Storage
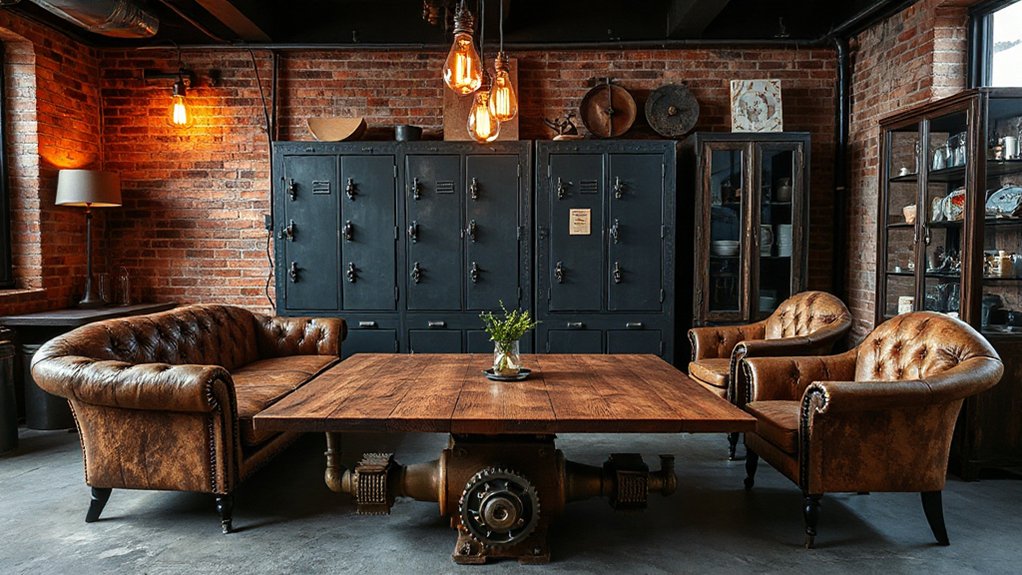
You anchor the room with statement seating—weathered leather, iron frames, and springs that still mean business.
You set riveted table centerpieces in the middle like factory relics, all bolted edges and scarred wood that begs for a whiskey ring.
You lock the look in with vintage storage solutions: battered trunks, apothecary drawers, and steel lockers that keep your clutter under guard.
Statement Seating Pieces
When the room’s all rivets, raw brick, and soot-dark metal, statement seating does the heavy lifting. You anchor the space with a leather club chair scarred like a factory foreman’s gloves, or a tufted settee that looks rescued from a railcar lounge. Pick frames in iron, aged oak, or pipework that shows its bolts; let patina and worn edges tell the story.
You balance grit with industrial comfort by layering a wool throw, saddle-stitched cushions, and a sprung seat that won’t quit after midnight. Go for silhouettes with presence—wingbacks, barrel backs, or deep modular benches—so guests sink in while the room keeps its hard stare.
Keep it bold, functional, and unapologetically old-world.
Riveted Table Centerpieces
Because a steampunk room thrives on engineered spectacle, a riveted table centerpiece becomes the floor’s beating heart. You anchor the space with a steel-and-reclaimed-wood slab, its edges banded in iron, its seams punched with proud rivets like shipyard armor.
Let the base show its bones: angle-iron trestles, bolted plates, a crank-wheel stretcher—Mechanical motifs that look ready to turn.
You temper the grit with Victorian motifs: a turned-leg silhouette, embossed brass corners, filigreed escutcheons, or a faint damask inlay scorched into the top.
Keep the finish honest—oil, wax, soot-dark stain—so scratches read like miles. Size it to your seating, then leave clearance for boots, knees, and conversation.
Vintage Storage Solutions
Where do the goggles, maps, and loose gears go once the rivets stop stealing the show? You stash them like a dockyard foreman: fast, smart, and within reach.
Start with Vintage storage that looks like it survived a soot-stained factory—iron-trim trunks, riveted lockers, and crate drawers on castors. Let the dents speak; polish only the brass pulls.
Hunt down antique cabinets with wavy glass and stubborn hinges, then line them with oilcloth and labeled tins. Slide a rolling tool chest under your worktable and park a leather-valise bench nearby for hidden compartments.
Keep shelves deep, brackets heavy, and hardware overbuilt. If it can hold blueprints, rum, and spare valves, it belongs. Dust less by closing doors.
Add Steampunk Details (Without the Cosplay Vibe)
If you want steampunk in an industrial space without tipping into costume-shop theatrics, build it like an old factory foreman would: deliberate, worn-in, and functional. Keep your base honest—raw brick, black steel, and scarred wood—then lace in Victorian motifs with restraint: a turned-brass valve handle, an etched glass sconce, a pocket-watch clock face.
Let industrial motifs do the heavy lifting. Swap plain pulls for knurled metal knobs, mount exposed conduit with cast brackets, and add a few riveted plates where a repair “had” to happen. Use aged copper, oiled bronze, and soot-dark leather so everything looks handled, not staged.
Hang patent diagrams in thin frames, stack weathered ledgers, and let gears appear as hardware—not props.
One Big Focal Point to Anchor the Room
Pick one statement piece—a riveted steel cabinet, a brass-faced clock, or a salvaged factory light—and let it call the shots.
Scale it big enough to bite, so your room feels anchored instead of cluttered with trinkets.
Then frame it with supporting decor—weathered wood, worn leather, and a few purposeful gears—so the focal point stays king.
Choose A Statement Piece
How do you keep industrial steampunk from looking like a scrapyard spill? You pick one statement piece and let it call the shots. Choose an object with grit and history: a riveted steel armoire, a salvaged factory cart turned bar, or a leather club chair with worn brass studs.
Aim for Victorian aesthetics with real presence—dark wood, tufting, burnished metal, smoke-stained patina—so the room feels curated, not cluttered. Then lace in Mechanical motifs that echo it: a gear-edged mirror, a pressure-gauge clock, pipe-and-valve sconces.
Keep everything else supportive and simple, like soot-dark walls or raw concrete, so your focal piece stays the mastermind.
Scale It For Impact
Once you’ve crowned a statement piece, scale it up until it owns the room like a foreman on the factory floor. Go oversized: a hulking riveted sofa, a massive gear-edged clock, or a crane-arm floor lamp that looms with purpose. You’re not decorating; you’re setting the hierarchy of the space.
Let its proportions bully the sightlines, then let everything else breathe. A big focal point thrives on negative space, so keep the surrounding field disciplined—Futuristic minimalism with a grimy backbone.
Balance the hard edges with Organic textures: worn leather, raw timber grain, oxidized brass, or soot-dark linen. When the scale feels just a little reckless, you’ve hit that industrial-steampunk sweet spot.
Frame With Supporting Decor
After your oversized centerpiece muscles into place, you’ve gotta frame it with supporting decor that reads like the crew around a hard-eyed boss. Build a perimeter: riveted side tables, pipe-shelf brackets, and a battered trunk that can take a hit. Keep everything angled toward the main piece, like workers facing the foreman’s whistle.
Layer Victorian motifs without going precious—etched mirror corners, brass filigree, a sepia map under glass—then rough it up with mechanical ornamentation: exposed gears, valve handles, pulley lamps, and gauge-face clocks. Use repetition, not clutter: match metal finishes, echo circular forms, and let leather and soot-dark wood steady the shine.
Leave breathing room so the focal point still throws its shadow. Keep sightlines clear.
Thrift, Upcycle, and DIY Steampunk-Industrial Decor
If you’re chasing that soot-kissed steampunk-industrial look without paying showroom prices, you’ll find the real magic in thrift hauls, hard-earned patina, and a little DIY grit. Hit flea markets for dented toolboxes, factory stools, and brass odds and ends that already smell like history.
Upcycle with intention: bolt reclaimed wood onto black pipe for a shelf that looks forged, not bought. Turn an old meter box into a shadow cabinet for Mechanical gadgets—gears, lenses, cracked gauges. Hang Vintage fashion like leather belts, suspenders, or a corset on iron hooks as wall texture.
Wire an enamel factory shade to a salvaged switch and cloth cord, and you’ve got light with teeth. Finish with wax, soot-stain, and timeworn labels, and let imperfections stay.
Industrial Steampunk Mistakes (and Quick Fixes)
Even when you’ve nailed the thrifted grit, a few common missteps can make your industrial steampunk room read like a costume shop instead of a lived-in workshop. If you stack gears on every surface, you flatten the story—pick one hero wall, then let iron, brick, and scarred wood breathe.
When you chase Steampunk fashion vibes with shiny brass everywhere, you lose patina; dull it down with wax, soot-toned stain, or blackened steel. If your lighting’s too white, the mood dies—swap in amber bulbs, cage shades, and dimmers.
Don’t mix random Industrial art styles; choose a lane: factory utilitarian, Victorian salvage, or nautical engine room. Finally, hide modern plastics with canvas, leather, and riveted covers.
Frequently Asked Questions
How Do I Incorporate Steampunk Style in a Small Apartment?
You’ll pull steampunk into a small apartment by going vertical: hang Vintage lighting, mount shelves on exposed piping, and swap sleek hardware for brass. Keep one battered leather piece, add gears, maps, soot-dark accents.
What’s the Best Way to Keep the Look Kid- and Pet-Friendly?
Start with safety first: you’ll anchor heavy pieces, round sharp metal, and hide cords—then the magic follows. Use Child proofing tips like latches; choose Pet safe materials: sealed wood, leather, low-VOC finishes.
How Can I Add Steampunk-Industrial Elements to a Rental Without Damage?
Use plug-in Lighting fixtures and command hooks, not screws. Stick on removable Wall accents—gear decals, faux brick panels, framed blueprints. Layer in thrifted metal trunks, leather, and pipe shelving with tension rods. No scars, all grit.
What Are Budget Ranges for an Industrial Steampunk Room Makeover?
Penny wise, pound foolish: you’ll spend $100–$300 for thrifted Vintage lighting and Metal accents, $300–$800 for curated pieces, or $800–$2,000 for bold upgrades—scuffed leather, soot-dark textiles, gearhead décor, and patina.
Where Can I Find Authentic Steampunk Antiques and Reproduction Parts?
You’ll find authentic steampunk antiques at salvage yards, estate auctions, and railroad museums; hunt reproduction parts on Etsy, eBay, and specialty prop shops. Look for Vintage machinery, Brass fixtures, and patina-rich finds from makers.
Conclusion
Now you’ve built an industrial steampunk space that’s gritty, grounded, and grand. You start with brick and beams, then balance coal blacks with burnished brass. You pick leather, lumber, and iron that feel lived-in, not fake. You light it with warm, wattage-rich Edison glow, then add gears and gauges in small, sharp strokes. Let one bold centerpiece command the room. Thrift, tweak, and tarnish—so your home tells a tough, timeless tale.