Your HVAC filter can quietly double as a system choke point when it’s installed backward or left too long. You’ll start by shutting the unit off at the thermostat, then cutting power at the disconnect or breaker, since code expects a true power isolation before you open panels. You’ll confirm airflow direction, seal the filter rack, and do a fast visual check for drain leaks and condenser blockage—but one small step most people skip can prevent a costly service call…
HVAC Service Safety Checklist and Shutoff Steps

Before you remove a panel or touch wiring, you’ll want to run a quick, code-compliant safety checklist and fully shut the HVAC system down: set the thermostat to OFF.
Cut power at the service disconnect (and the breaker if needed). Verify zero voltage with a properly rated meter, and confirm the blower has stopped before proceeding.
Apply lockout/tagout where available so nobody restores power unexpectedly. Keep your work area dry and well lit, and don’t bypass door interlock switches.
Wear safety equipment: safety glasses, cut-resistant gloves, and an N95 if dust is present.
If you’re doing air filter installation, handle the media carefully to avoid tearing it, and keep fingers clear of sharp sheet-metal edges.
Restore panels before re-energizing, then power up.
Do a Quick HVAC System Inspection First
Before you open the unit, confirm your thermostat is set to the correct mode, temperature, and schedule so you’re not creating an unintended call for heat or cooling.
Walk the space and inspect vents and registers for blockage, damaged grilles, or loose fittings that could restrict airflow and violate basic safety clearances.
Restore power briefly and listen for abnormal rattling, buzzing, or grinding, then shut it back off immediately if you detect anything irregular.
Check Thermostat Settings
Why start with the thermostat? It’s your control point, and a wrong setting can mimic equipment failure. Verify the mode (Heat/Cool/Auto) matches the season, and set a reasonable setpoint to prevent short-cycling. Confirm the schedule isn’t forcing setbacks during occupied hours, and disable “Hold” if it conflicts with programming.
Check Thermostat placement: it should be on an interior wall, away from direct sun, supply air, kitchens, or drafts, per manufacturer instructions and local code practices.
Next, confirm temperature calibration. Compare the thermostat reading to a calibrated thermometer at the same height for 10 minutes. If it’s off, adjust via installer setup or document replacement.
Before opening the stat, de-energize the HVAC circuit, and keep low-voltage wiring intact.
Inspect Vents And Registers
Once you’ve confirmed the thermostat’s calling correctly, walk the space and inspect every supply and return vent/register for airflow and obstruction. Hold a tissue at each grille to verify draw on returns and discharge on supplies. If airflow is weak, check for vent blockage from rugs, furniture, drapes, pet beds, or closed dampers. Keep required clearances around registers, and don’t cover returns; code requires adequate air pathways for safe equipment operation.
Shut the system off at the thermostat before you perform register maintenance. Remove grilles carefully, vacuum dust, and wash with mild detergent; dry fully to prevent corrosion. Confirm screws are tight, edges aren’t sharp, and grilles sit flush to avoid rattles and air leaks. Note any crushed duct boots or gaps for sealing.
Listen For Unusual Noises
After you’ve verified vents and registers, listen closely as the system starts, runs, and shuts down—unusual sounds often flag mechanical wear or unsafe conditions. Note when the noise occurs: startup clanks can suggest loose blower wheels, relays, or duct expansion; steady rattles often indicate panel screws, failing bearings, or vibration transfer. A high-pitched squeal can point to belt issues or motor problems; hissing may indicate duct leakage or refrigerant concerns—don’t open the sealed circuit.
For Noise diagnosis, shut power off at the disconnect before removing any access panel, and reinstall all covers to maintain required safeguards. Check that flex ducts aren’t kinked and add Sound insulation only where it won’t block airflow, condensate drainage, or service clearances.
Document findings and call a licensed technician for combustion, refrigerant, or electrical faults.
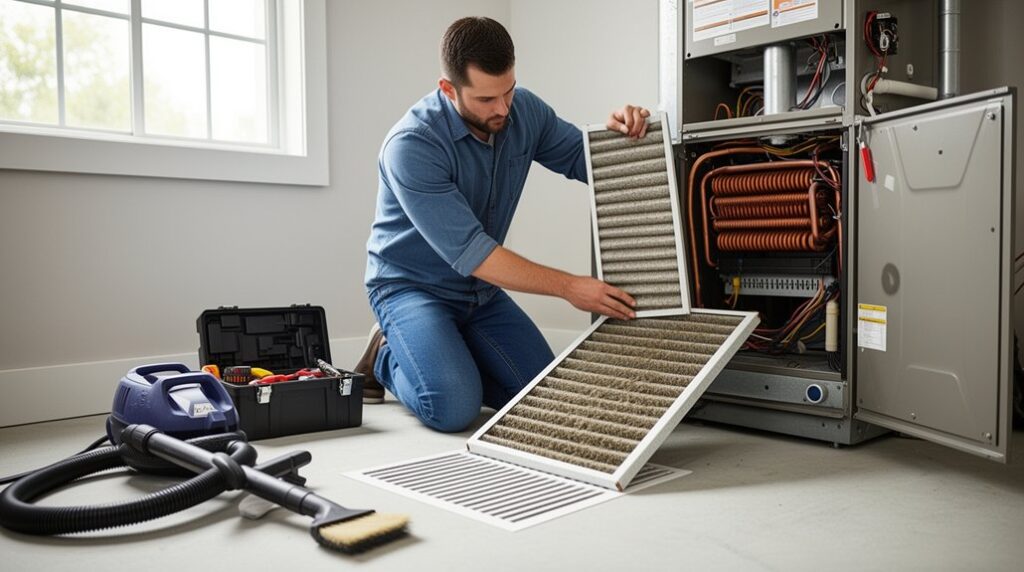
Change Your HVAC Air Filter in Minutes
How quickly can you boost HVAC airflow and protect your blower motor? In minutes, if you change the air filter correctly.
First, set the thermostat to OFF, then shut off power at the service switch or breaker as required by local code.
Open the return grille or filter cabinet; keep hands clear of sheet-metal edges.
Note air filter types used in your system (disposable pleated, washable, media cabinet), then remove the old filter without shaking debris.
Vacuum the slot if needed, and wipe the door gasket.
Install the new filter with the airflow arrow pointing toward the blower.
Reseat the cover to prevent bypass air.
Restore power, then run the system and confirm normal static and noise.
Follow filter replacement schedules from the manufacturer and occupancy conditions.
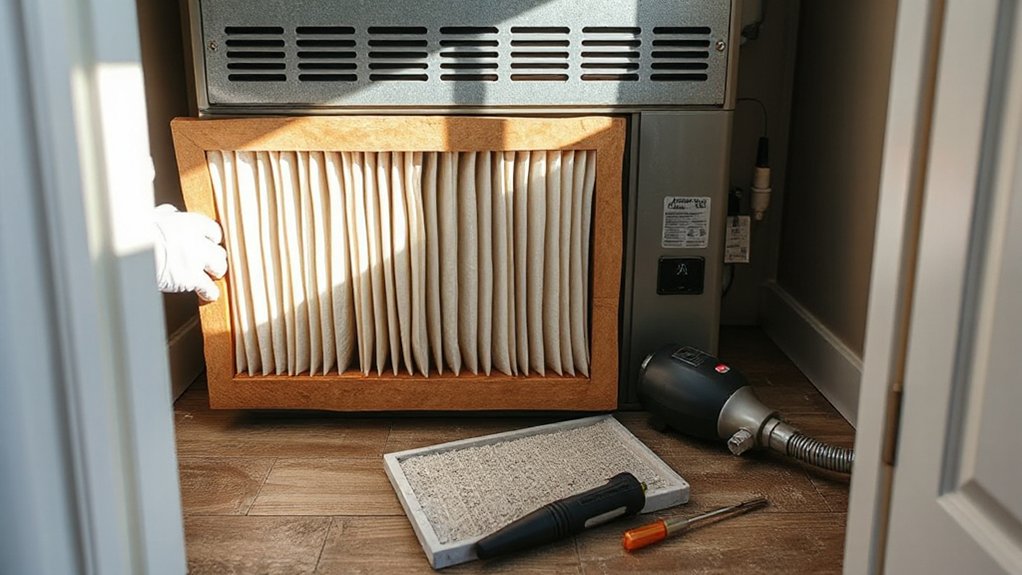
Choose the Right HVAC Air Filter (MERV)
Although higher filtration sounds like an automatic upgrade, you need to match the filter’s MERV rating to your equipment’s allowable pressure drop so you don’t starve the blower for airflow or trip safety limits. Check the air handler nameplate, install manual, or commissioning data for external static pressure limits, then select a filter that keeps total static within spec.
Use manufacturer performance curves when available, not guesses. As a baseline, many residential systems run best with MERV 8–11; higher MERV ratings can be acceptable only if the blower and ductwork support them.
Verify the filter’s exact size, gasket seal, and airflow direction arrow to prevent bypass. If you add a thicker media filter, confirm the rack fits without gaps.
Proper selection also stabilizes air filter lifespan.
How Often Should You Change HVAC Filters?
Picking the correct MERV rating only works if you replace the filter on a schedule that keeps pressure drop within the unit’s rated external static and maintains required airflow for safe heat exchanger and coil operation.
As a baseline, set replacement frequency at 30 days for 1-inch filters and 90 days for 4–5-inch media, then adjust based on measured conditions.
If you’ve got pets, recent remodeling, high occupancy, or run the blower continuously, shorten intervals.
If you notice rising supply temperature in heating, coil icing risk in cooling, unusual blower noise, or a higher ΔP across the filter, change it immediately.
Don’t exceed the manufacturer’s air filter lifespan, and document dates to support warranty and code-required maintenance records.
Clean HVAC Vents, Grilles, and Return Ducts
Even if you replace filters on schedule, dust buildup on supply registers, return grilles, and the return drop can restrict airflow, raise external static pressure, and pull contaminants into the blower and coil.
Shut off power at the service switch or breaker before you remove any air vent cover to prevent fan start-up. Wear gloves and an N95, then vacuum grilles with a HEPA attachment.
Wash metal registers with mild detergent, dry fully, and reinstall with all screws so you don’t create rattles or sharp edges.
For the return drop, remove loose debris only; don’t disturb lining or mastic.
Seal gaps at boot-to-drywall with UL-181 foil tape, not cloth duct tape.
After filter replacement, confirm all grilles are unobstructed.
Clean the Outdoor Condenser to Boost Airflow
Before you clean the outdoor condenser, shut off power at the disconnect (and breaker if required) and confirm it’s de-energized.
Clear leaves, grass, and other debris from the unit’s perimeter to maintain code-recommended clearance and unrestricted airflow.
Then rinse the condenser fins gently with low-pressure water, spraying from the inside out to avoid fin damage and preserve heat-transfer performance.
Clear Debris Around Unit
Although your condenser’s fan can move a lot of air, it can’t perform efficiently when leaves, grass clippings, or windblown trash block the coil and restrict airflow. Shut off power at the service disconnect and verify the unit is de-energized before you work nearby.
Clear outdoor debris from the pad, grille, and coil perimeter, and remove vines or fallen branches that can snag the fan guard.
Maintain code-friendly clearances: keep at least 24 inches around the unit and 60 inches above it, or follow the manufacturer’s label if it requires more.
Reposition landscaping barriers like mulch, edging, and shrubs so they don’t funnel clippings into the coil.
Keep gutters and downspouts from dumping water and debris onto the condenser.
Wash Condenser Fins Gently
Once you’ve cleared the area, rinse the condenser coil so the fins can pass air freely without forcing the fan or compressor to work harder. Shut off power at the outdoor disconnect and verify de-energized before you spray.
Use a garden hose with a gentle, vertical stream; don’t use a pressure washer, which can fold fins and restrict airflow.
Spray from inside out when possible, keeping the nozzle several inches back. Apply a non-acid, EPA-registered coil cleaner only if the label allows homeowner use, then rinse thoroughly.
During fin cleaning, straighten minor bends with a fin comb matched to fin pitch. Keep water away from the electrical compartment and maintain clearances per manufacturer instructions and local code.
Regular condenser maintenance reduces head pressure and improves efficiency.
Service the Indoor Unit: Blower and Drain Line
When you service the indoor unit, focus on the blower assembly and condensate drain line because restricted airflow or a partially blocked drain can raise static pressure, reduce efficiency, and trigger water damage.
De-energize at the disconnect and verify with a meter before opening panels. Remove the blower access door, then vacuum and wipe the wheel and housing; don’t bend fins or disturb balance weights. Confirm the wheel spins freely and that wiring connectors are tight, with no insulation damage.
Restore panels to maintain proper Indoor airflow and prevent code issues with interlock switches.
For Drain maintenance, flush the condensate trap and line with approved solution, clear the vent, and confirm continuous slope to the termination. Inspect the secondary pan, float switch, and any cleanout caps for tight seals.
Test Your Thermostat and HVAC System Settings
Set your thermostat to the correct mode (Heat/Cool/Auto) and verify schedules, fan settings, and batteries so the system operates as intended.
Compare the displayed temperature to a known-accurate thermometer, then adjust calibration per the manufacturer’s instructions with power isolated if you must access wiring.
Apply a small setpoint change and confirm the HVAC responds correctly—call, ignition/contactor engagement, blower start, and proper shutdown—without repeated cycling or fault codes.
Verify Thermostat Mode
Before you open the cabinet or touch any wiring, verify your thermostat mode and system settings so the HVAC equipment won’t start unexpectedly. Set the thermostat to OFF, then confirm the equipment status at the air handler and outdoor disconnect—no blower, no compressor, no inducer.
Perform Mode verification by selecting HEAT and COOL briefly (without changing setpoints) and ensuring the correct equipment type is enabled (heat pump vs. conventional, single- vs. multi-stage).
Check that fan control matches your system: AUTO for most forced-air setups, ON only when needed for testing.
Confirm schedule holds, vacation mode, and remote app overrides are disabled.
Note any Thermostat calibration alerts or sensor faults, since they can force unintended calls.
Reinstall covers before restoring power and testing.
Calibrate Temperature Settings
After you’ve confirmed the thermostat mode is correct, calibrate temperature settings so the control logic matches real room conditions and the HVAC doesn’t short-cycle or run excessively.
De-energize the thermostat circuit at the service switch or breaker if you’ll remove the cover; follow lockout/tagout where required.
Compare the thermostat’s displayed temperature to a calibrated digital thermometer placed at the same height, away from supply registers, exterior doors, sunlight, and heat sources.
Let readings stabilize for 10–15 minutes.
If the offset exceeds the manufacturer’s tolerance, adjust the internal temperature offset (or “calibration”) setting per the installation manual.
Document the change and restore covers to maintain proper insulation and sensor airflow.
Good Temperature calibration improves setting accuracy and supports energy-code compliance.
Confirm System Response
Once you’ve calibrated the thermostat, confirm the system responds correctly by running a controlled call for heating and cooling and verifying each stage and accessory energizes as intended.
Set the fan to AUTO, then raise the setpoint to call heat; verify inducer, ignition, flame, and blower sequencing, and confirm the gas valve and safety limits operate without faults.
Next, drop the setpoint to call cooling; confirm condenser contactor pull-in, compressor and outdoor fan start, and indoor blower delay matches manufacturer specs.
Check for proper System response: stable supply-air temperature change and no short-cycling.
Verify humidifier, ERV, or zoning dampers if installed.
Keep panels secured, observe clearances, and follow NEC lockout/tagout before accessing controls.
Document results to improve troubleshooting efficiency later.
Spot HVAC Warning Signs and Call a Pro
Although routine filter changes and basic upkeep help, you should stop DIY work and call a licensed HVAC technician when you notice warning signs that indicate a safety hazard, refrigerant issue, or electrical fault—such as burning odors, repeated breaker trips, visible arcing, water pooling at the air handler, ice on refrigerant lines, gas smells, or carbon monoxide alarm activation.
Shut the system off at the disconnect, ventilate the area, and don’t reset breakers or bypass safeties. These symptoms can violate manufacturer instructions and electrical/fuel-gas codes, and they can signal a failed condensate drain, cracked heat exchanger, or low charge/leak requiring EPA-compliant handling.
A pro will pressure-test, verify combustion, measure superheat/subcooling, and confirm proper airflow. That protects Indoor air quality and supports Energy saving tips through safe, efficient operation.
Frequently Asked Questions
Can I Use Washable Air Filters Instead of Disposable Ones?
Yes, you can use washable air filters if your HVAC specs allow it. Choose Reusable filters with correct MERV rating, clean and dry them fully, and monitor filter lifespan to maintain airflow and code-compliant operation.
Will Upgrading My Filter Increase My Energy Bills?
It can if Filter upgrades raise airflow resistance, increasing blower wattage and runtime. Choose a MERV rating your system can handle for Energy efficiency. Follow manufacturer specs, keep ducts sealed, and replace filters on schedule.
How Do I Reduce HVAC Noise After Servicing the System?
Sure, ignore that rattle—it’ll only get louder. You’ll reduce HVAC noise by tightening panels, leveling the unit, and adding Soundproofing techniques plus Noise reduction accessories. Shut power at the disconnect, follow code, and verify clearances.
Do Air Purifiers Replace the Need for Regular HVAC Filter Changes?
No, air purifiers don’t replace regular HVAC filter changes. Air purifier limitations mean your system still needs rated filtration to protect coils and airflow. Follow code guidance and manufacturer specs for filter maintenance frequency.
Should I Service My HVAC System Differently if I Have Pets?
Yes—you should adjust your maintenance schedule for pets. Pet hair and dander load filters and coils faster, so you’ll change filters more often, clean returns, and confirm condensate drainage and combustion/venting per code.
Conclusion
When you service your HVAC and swap filters, you’re tending the lungs of your home—clean air in, strain out. Keep safety your anchor: shut it off at the thermostat, lock out the disconnect/breaker, and follow manufacturer instructions and local code. Set the filter arrow toward the blower, seal the rack, and verify airflow. Clear the condenser, check the drain, and listen on startup. If alarms appear, call a licensed pro.